WordPress WooCommerce Plugin Products Settings post will show you how to configure the products and downloadable settings for your online store.
Last Updated: May 2, 2023
Latest News: Updated the information in this tutorial to stay current with the latest plugin version 7.6.1.
WooCommerce product settings is simple and straight forward to set up. Some of these settings have a question mark on the side to help you understand more about the options you are about to enable and or configure. There are drop-down menus available for some of the options. Make sure you select the appropriate feature per option you enable.
Important: It is always important to make sure to test all the options you enable before going live.
Note: Some of the steps below are enabled when you first install the plugin.
What You Need:
- WooCommerce wordpress plugin.
- WooCommerce website with access to all their products. (Note: This is an affiliated link. I get a small commission if you make a purchase.)
WordPress WooCommerce Plugin Products Settings
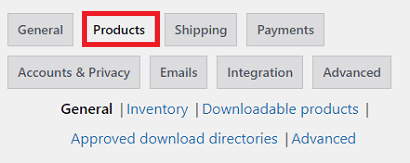
Step 1 ) Go to WooCommerce -> Settings -> Products tab to start configuring the products settings. The product settings menu is divided into the following options as illustrated in the image below.
Products Options
- General
- Inventory
- Downloadable products
- Approved download directories
- Advanced
General
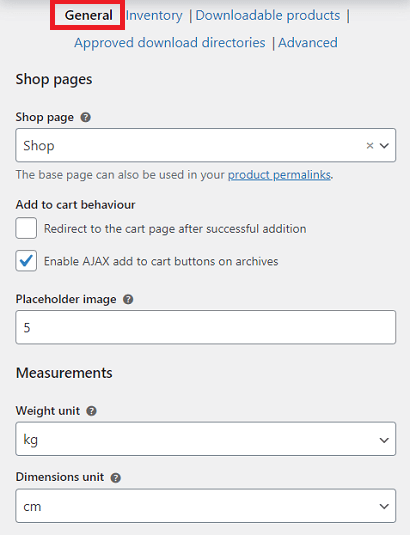
Step 2 ) The following image General options allows you to set up the following options.
General options
Shop pages
- Shop page
- Add to cart behaviour
- Redirect to the cart page after successful addition
- Enable AJAX add to cart buttons on archives
- Placeholder image
Measurements
- Weight unit
- Dimensions unit
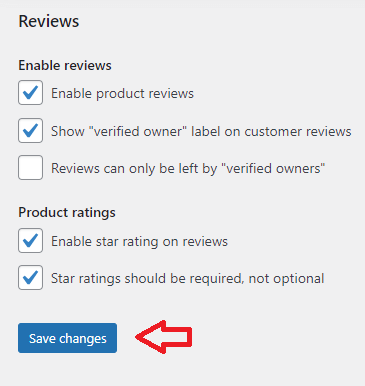
Step 2-a ) The following image allows you to set up the following options.
Reviews options
- Enable reviews
- Enable product reviews
- Show “verified owner” label for customer reviews
- reviews can only be left by “verified owners”
- Product ratings
- Enable star rating on reviews
- Star rating should be required, not optional
- Click on Save changes button after you finish configuring your settings.
Inventory
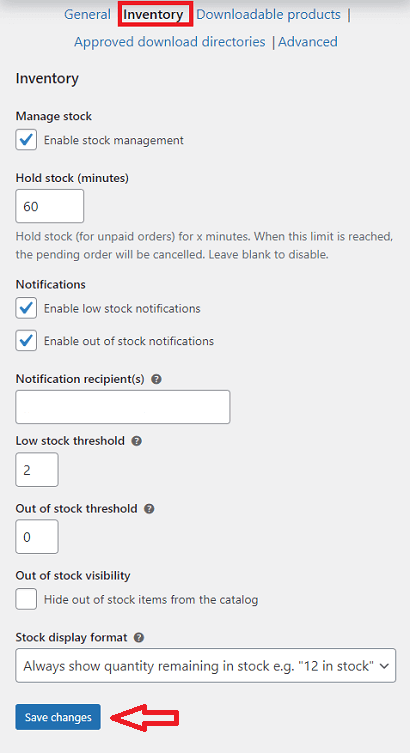
Step 3 ) The following image Inventory allows you to select from the following options.
Inventory options
- Manage stock
- Hold stock (minutes)
- Notifications
- Enable low stock notifications
- Enable out of stock notifications
- Notification recipient(s)
- Low stock threshold
- Out of stock threshold
- Out of stock visibility
- Stock display format
- Click on Save changes button after you finish configuring your settings.
Downloadable Products
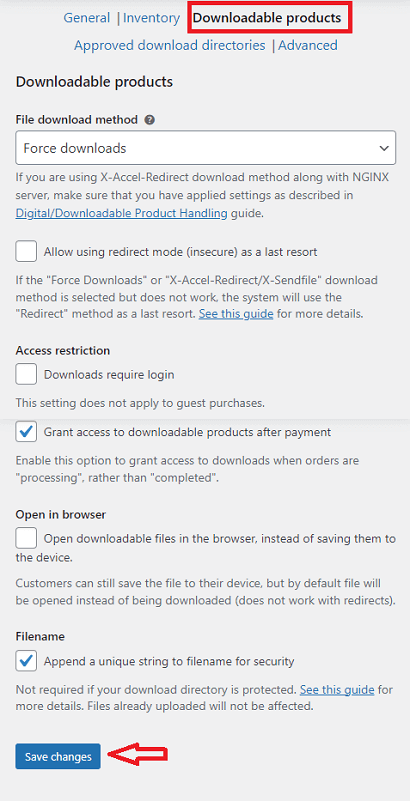
Step 4 ) The following image Downloadable Products allows you to select from the following options.
Downloadable products
- File download method
- Allow using redirect mode (insecure) as a last resort
- Access restriction
- Downloads require login
- Grant access to downloadable products after payment
- Open in browser
- Filename
- Click on Save changes button after you finish configuring your settings.
Approved download directories
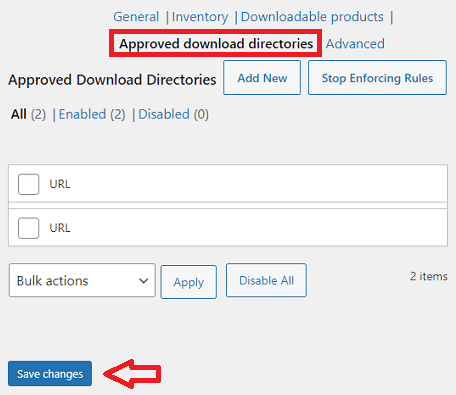
Step 5 ) The following image Approved download directories allows you to set up the following options.
Approved download directories options
- Click on Add New button to add a new directory folder.
- Click on Stop Enforcing Rules button to stop all the rules being enforced.
- Click on Save changes button after you finish configuring your settings.
Advanced
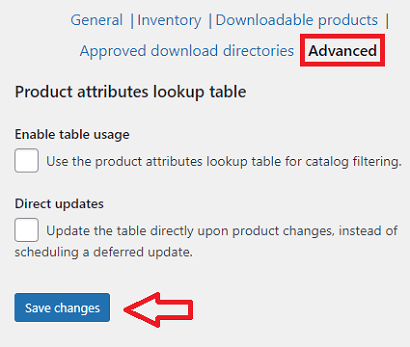
Step 6 ) The following image Advanced allows you to select from the following options.
Advanced options
- Enable table usage
- Direct updates
- Click on Save changes button after you finish configuring your settings.
================================
The above instructions are simple and easy to follow.
Click on the following URL Checkout Settings to learn more.
If you have any questions please let me know.
I will be updating this tutorial from time to time so make sure you come back for the latest.
Enjoy.
WooCommerce Plugin Tutorial List: