WP Simple Shopping Cart PayPal Smart Checkout shows you how to setup and configure PayPal Smart Checkout Settings and more.
Last Updated: February 21, 2024
Latest News: Updated the documentation.
The following instructions shows you how to set up and configure PayPal Smart Checkout Settings. You will also learn how to change the button shape, color and much more. By enabling this option you are allowing your customers to choose an alternative method of payment.
What you need:
Premium addons:
(Note: The 3 links below are affiliated link. I get a small commission if you purchase this product.)
Note: For premium addons support, please click on the following link contact.
WP Simple Shopping Cart PayPal Smart Checkout
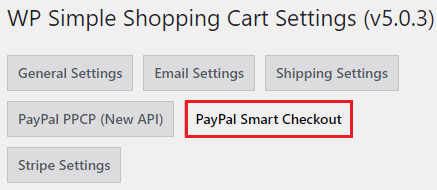
Step 1 ) Go to Simple Cart -> Settings -> PayPal Smart Checkout tab as illustrated in the image below to start configuring the PayPal Smart Checkout options.
PayPal Smart Checkout Settings
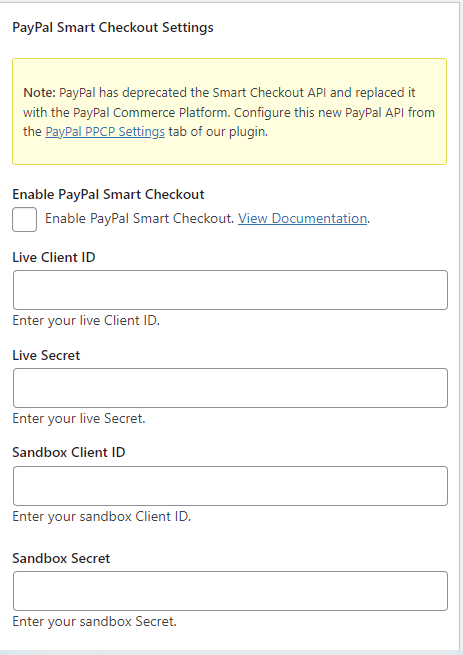
Step 2 ) The following image PayPal Smart Checkout Settings allows you to set up the following options.
Note: PayPal has deprecated the Smart Checkout API and replaced it with the PayPal Commerce Platform. Configure this new PayPal API from the PayPal PPCP Settings tab in the plugin.
PayPal Smart Checkout Settings Options
- Enable PayPal Smart Checkout
- Live Client ID
- Live Secret
- Sandbox Client ID
- Sandbox Secret
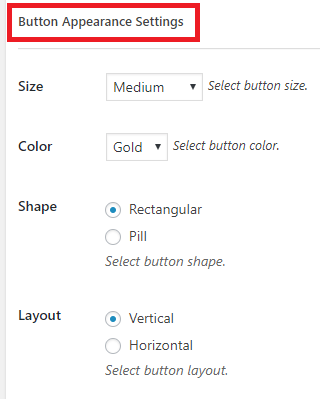
Button Appearance Settings
Step 3 ) The following image Button Appearance Settings allows you to set up the following options.
Button Appearance Settings Options
Size
- Medium
- Large
- Responsive
Color
- Gold
- Blue
- Silver
- Black
Shape
- Rectangular
- Pill
Layout
- Vertical
- Horizontal
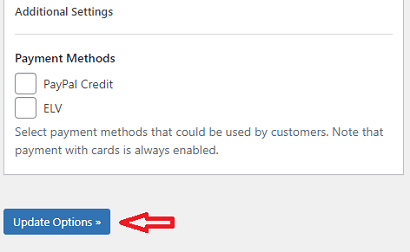
Additional Settings
Step 4 ) The following image Additional Settings allows you to set up the following options.
Additional Settings Options
- PayPal Credit
- ELV
- Click on Update Options button when you finish completing the settings.
Troubleshooting
Q1 I received the following error: Something went wrong…” while trying to set up Smart Checkout Options. How do I fix this?
Solution: The smart checkout option requires correct API permissions for it to work. If this is not setup correctly you will run into all sorts of issues, this might mean that the current PayPal Merchant account has some issues. The following test might help you work out if it is a PayPal account issue. Turn off the smart checkout option (in the settings menu of the plugin). Keep only the standard checkout. Does that standard PayPal checkout option work with that account? Check the following link forum post to learn more.
That is how simple it is to configure the advance settings in the plugin.
Click on the following link Email Settings to complete the next part of the tutorial.
I will be updating this post from time to time. So keep coming back for more.
Enjoy.
WordPress Simple Shopping Cart List