WordPress Affiliates Manager Pages And Forms Settings shows you how to edit the URL for the pages and the registration form and more.
Last Updated: May 27, 2021
Latest News: Updated the documentation.
The following tutorial shows you how edit the default pages created by the plugin when you install it for the first time. Please note that if you decide to create your own customize pages, you need to remember to add the URL in the fields below. It is also very important to add the correct shortcode to the corresponding page.
What You Need:
- Affiliates Manager plugin.
- You can also purchase the Affiliate Manager premium version. (Optional)
WordPress Affiliates Manager Pages And Forms Settings
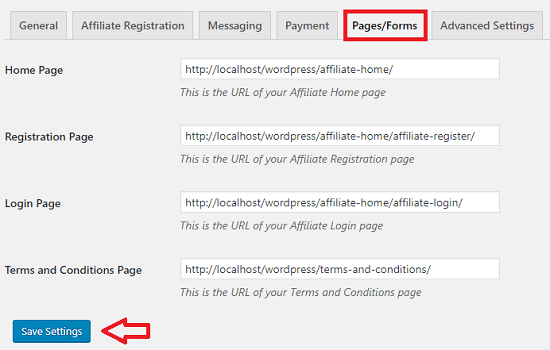
Step 1 ) Go to Affiliates -> Settings -> Pages/Forms to set up the following options.
The default pages are created by the plugin when you first install the plugin. You can choose to create your own pages if you want. If you, make sure you add the new URL in one of the fields below.
Note: Always make sure you add the correct shortcode per page.
Pages/Forms
- Home Page = The shortcode for this page is
[AffiliatesHome] - Registration Page = The shortcode for this page is
[AffiliatesRegister] - Login Page = The shortcode for this page is
[AffiliatesLogin] - Terms and Conditions Page = There is no shortcode for this page. This page is created by the plugin by default. You can edit the content to suit your needs.
- Click on Save Settings button when you finish setting up the default pages.
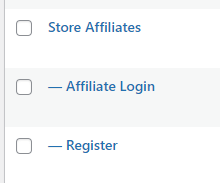
Step 2 ) Go to Pages -> All Pages to view the URL structure for the affiliates pages added by the plugin when you install the plugin. This structure is letting you know that Store Affiliates page is the parent page of the following pages Affiliate Login and Register.
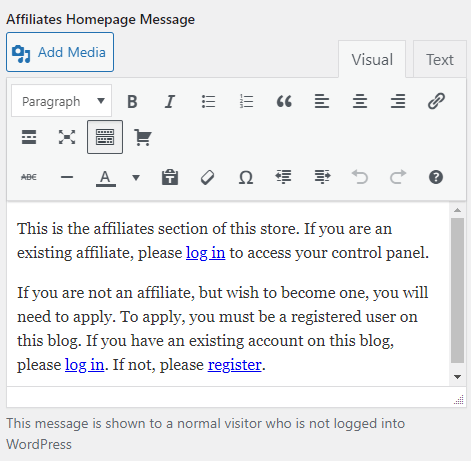
Step 3 ) Go to Affiliates -> Settings -> Affiliate Registration -> Affiliates Homepage Message. The following image shows you the message you can customize for your site. This is the message the visitors will see when they visit the affiliate home page in your site.
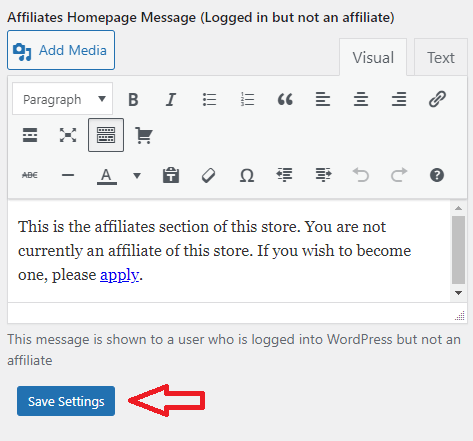
Step 3-a ) The following image shows you the message you can customize for your site. This message is shown to a user who is logged into WordPress but not an affiliate.
Troubleshooting Steps
Q1 I have changed the URL because it suits my site. However the default pages are still displayed and I am getting a 404 page not found error message. How do I fix this?
Answer: Revisit steps 1 and 2 above and make sure the new pages are also added in these steps.
FAQ
Q1 My site is not a store and the word Store does not march with my site. How do I change the word Store?
Answer: Read the following forum post.
==================================
That is how simple it is for wp users to sign up and become an affiliate in your site.
If you have any questions please let me know.
Enjoy.
WP Affiliates Manager Tutorials List