The following Selling a Product Using WP Express Checkout tutorial shows you how to add a product to your post or page using a shortcode and more.
Last Updated: April 4, 2025
Latest News: Updated the documentation.
Once you create your product, you will need to add it to a WordPress post or page so that your customers can click the ‘Buy Now’ button and complete the easy PayPal checkout process. This will involve them either using their PayPal account or credit card details to make a payment for the goods or services you are offering. Adding your product’s ‘Buy Now‘ button to your WordPress website is as simple as copying and pasting a shortcode. Follow the instructions below to easily add a product’s ‘Buy Now’ button to your website.
What You Need:
Selling a Product Using WP Express Checkout
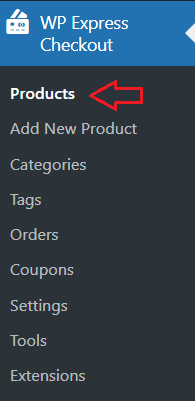
Step 1 ) Click on WP Express Checkout -> Products admin menu as illustrated in the image below.
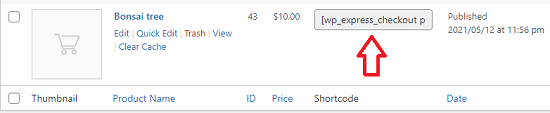
Step 2 ) Copy and paste the shortcode for the product that you wish to display a ‘Buy Now’ button for on your website as illustrated in the image below.
Step 3 ) Create a new WordPress ‘Post‘ or ‘Page‘. Ensure you add a title tp your page or post. Paste in the shortcode that you have copied from the previous step and Publish your page or post when you are ready.
Viewing The Buy Now Button
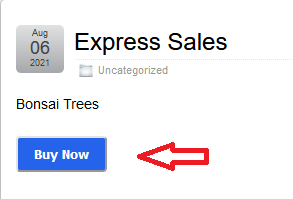
Step 4 ) Once you have added your product’s shortcode to a WordPress page or post and you have published out that page, you should now see a ‘Buy Now’ button on the front end of your website as illustrated in the image below. This is just a simple buy now button with a title, nothing fancy and no image added to the product.
Note: The display of your buy now button and product title will appear differently in your site based on your settings and theme.
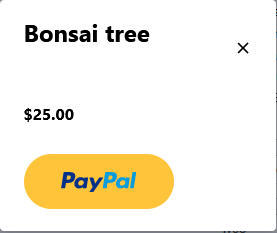
Step 5 ) When you click on the Buy Now button above, you should see a popup window displayed as illustrated in the image below.
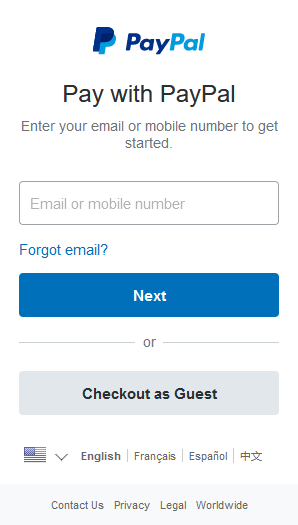
Step 6 ) When you click on the PayPal button above, the following PayPal window is displayed as illustrated in the image below. The customer then has the choice of paying with their PayPal account or checkout as a guest.
Displaying A Product With Template
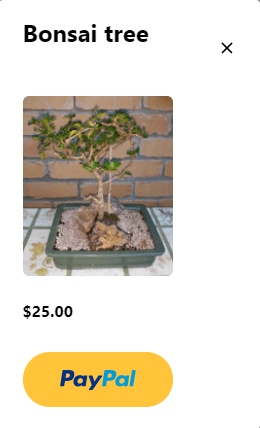
Using the basic shortcode will only add the product’s Buy Now button to your WordPress Post or Page. If you wish to display your product details along with a purchase button, you will need to use one of the product Templates in the shortcode as illustrated below.
[wp_express_checkout product_id="43" template="1"]
The image below displays the product using the above shortcode with an image and other details.
FAQ
Q1 Does this plugin collect credit car details?
Answer: This plugin NEVER collects any card information. The transaction is done by the PayPal express checkout API which is completely controlled by PayPal. Everything within the payment popup window comes from PayPal’s server. The payment buttons all come from PayPal. You can verify this by checking the Address URL that is shown within the payment popup where you enter the paypal login/card information. So it is impossible for this plugin to compromise a card since the data is only collected by PayPal. Click the following link forum post to learn more.
=============
Q2 How do I hide the billing fields before going to PayPal? These fields are displayed in the popup window when the order is placed. For example:
The input boxes I would like removed are named:
wpec_billing_address_field_input
wpec_billing_city_field_input
wpec_billing_country_field_input
wpec_billing_state_field_input
wpec_billing_postal_code_field_input
Answer: The following filter can be used to hide the billing info fields:
wpec_hide_billing_info_fieldsThe following is an example code snippet added to your functions.php file that should hide the fields:
function custom_hide_fields_override( $amount ){
return 1; }
add_filter( 'wpec_hide_billing_info_fields', 'custom_hide_fields_override' );
=============
Q3 Can I disable the PayPal “Pay Later” Option?
Answer: Try checking the following checkbox in the “Disable Funding” section of our plugin’s settings. That should disable the standard “Pay Later” option (which is really PayPal credit). Click the following link forum post to learn more.
Troubleshooting
Q1 I have a problem when testing in both Sandbox and Live mode and in both instances it gets stuck as soon as you click on the pay button. When I did the live version it did made the charge but I was never able to access the download. Below is the error message displayed in the log file.
Log error message:
HP Fatal error: Uncaught Error: Call to undefined function PHPMailer\PHPMailer\ctype_alnum() in /hermes/bosnacweb01/bosnacweb01bc/b2625/ipw.evvisual/public_html/wp-includes/PHPMailer/PHPMailer.php:1825Possible Solution: Check the following link forum post to learn more.
============================
That is all you need to do to sell a product in your site using WP Express Checkout plugin.
I will be updating this post from time to time. So keep coming back for more.
Enjoy.
WP Express Checkout Plugin Tutorial List: