Photonic Plugin Settings Options shows you how to configure the settings for the various social networks like Google Photos, SmugMug and more.
Last Updated: March 31, 2022
Latest News: Updated the documentation.
This post will help you manage all the settings for the various social networks Photonic manages plus the standard WordPress Media library. You can also manage and configure Google Photos.
Each social network has various options for you to set up. Some have a lot of features and some have only a few features available. This of course depends on the social network API and how much flexibility it allows you to manage from outside.
Social Networks
- Flickr
- SmugMug
- Zenfolio
What You Need:
- Photonic
- Suffusion Theme (Optional = I added this theme because it is developed by Sayontan Sinha. Both plugin and theme work flawlessly together.)
Photonic Plugin Settings Options
Gutenberg Settings
Important: If you see the following message as illustrated in the image below, configure Photonic to work with Gutenberg first before you begin configuring your settings.

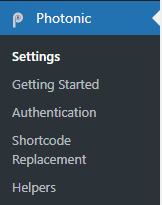
Step 1 ) The following image Photonic allows you to setup and mange the following admin menu settings.
Photonic Admin Menu
- Settings
- Getting Started
- Authentication
- Shortcode Replacement
- Helpers
Generic Options
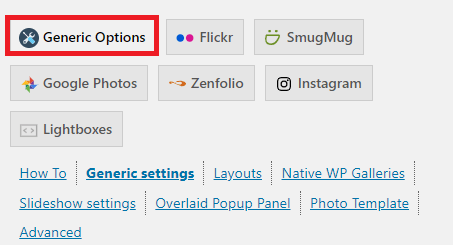
Step 2 ) Go to Photonic -> Settings -> Generic Options as illustrated in the image below to start adjusting the settings. There are many tabs that allows you to manage your WordPress galleries and more. The following is the list of tabs you can configure for your galleries.
Generic Options Features
- How To
- Generic settings
- Layouts
- Native WP Galleries
- Slideshow settings
- Overlaid Popup Panel
- Photo Template
- Advanced
Flickr
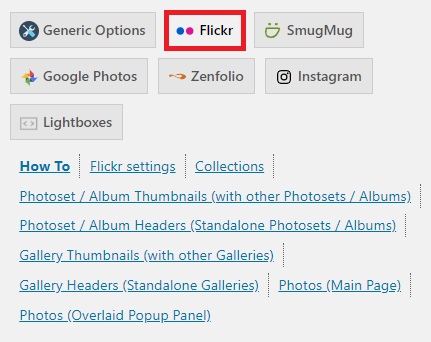
Step 3 ) Go to Photonic -> Settings -> Flickr as illustrated in the image below to start adjusting the settings. There are many tabs that allows you to manage your WordPress galleries and more. The following is the list of tabs you can configure for your galleries.
Flickr Settings Options
- How To
- Flickr settings
- Collections
- Photoset / Album Thumbnails (with other Photosets / Albums)
- Photoset / Album Headers (Standalone Photosets / Albums)
- Gallery Thumbnails (with other Galleries)
- Gallery Headers (Standalone Galleries)
- Photos (Main Page)
- Photos (Overlaid Popup Panel)
SmugMug
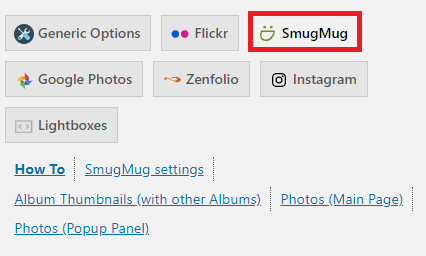
Step 4 ) Go to Photonic -> Settings -> SmugMug as illustrated in the image below to start adjusting the settings. There are many tabs that allows you to manage your WordPress galleries and more. The following is the list of tabs you can configure for your galleries.
SmugMug Settings Options
- How To
- SmugMug settings
- Album Thumbnails (with other Albums)
- Photos (Main Page)
- Photos (Popup Panel)
Google Photos
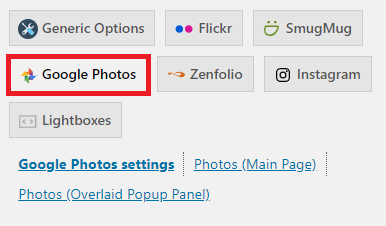
Step 5 ) Go to Photonic -> Settings -> Google Photos as illustrated in the image below to start adjusting the settings. There are many tabs that allows you to manage your WordPress galleries and more. The following is the list of tabs you can configure for your galleries.
Google Photos Settings Options
- Google Photos settings
- Photos (Main Page)
- Photos (Overlaid Popup Panel)
Zenfolio
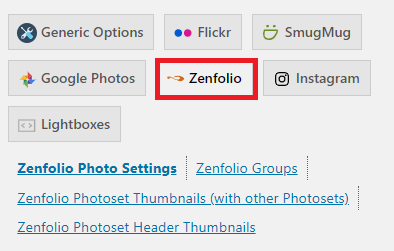
Step 6 ) Go to Photonic -> Settings -> Zenfolio Photos as illustrated in the image below to start adjusting the settings. There are many tabs that allows you to manage your WordPress galleries and more. The following is the list of tabs you can configure for your galleries.
Zenfolio Settings Options
- Zenfolio Photo Settings
- Zenfolio Groups
- Zenfolio Photoset Thumbnails (with other Photosets)
- Zenfolio Photoset Header Thumbnails
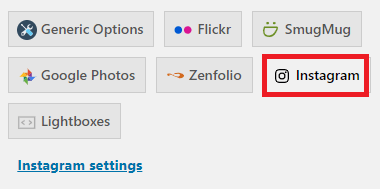
Step 7 ) Go to Photonic -> Settings -> Instagram as illustrated in the image below to start adjusting the settings. There are many tabs that allows you to manage your WordPress galleries and more. The following is the list of tabs you can configure for your galleries.
Instagram Settings Options
- Instagram settings
Lightboxes
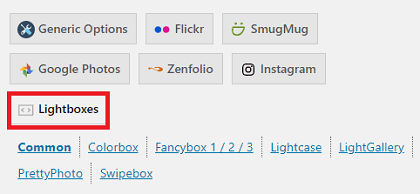
Step 8 ) Go to Photonic -> Settings -> Lightboxes as illustrated in the image below to start adjusting the settings. There are many tabs that allows you to manage your WordPress galleries and more. The following is the list of tabs you can configure for your galleries.
Lightboxes Settings Options
- Common
- Colorbox
- Fancybox 1 / 2 / 3
- Lightcase
- LightGallery
- PrettyPhoto
- Swipebox
===================================
This tutorial will be updated from time to time in accordance to any new changes made by Sayontan Sinha the developer.
If you have any questions please let me know.
Enjoy.
Photonic Plugin Tutorial List: