How to password protect WordPress pages will show you how to password protect pages by adding a function to a custom template.
Last Updated: January 7, 2020
Latest News: Updated the documentation.
I have tested this code with WordPress 5.3.2 and it works.
There are times you might want to protect one or more of your website pages from your members. You can use a plugin for this, but you might not want to use a plugin and instead add some code yourself.
This tutorial does exactly that, It shows you how to protect a page or pages and redirect the log in user depending on their credentials.
Credit is given to:
Note: You might like to also check the following link using-password-protection.
How To Password Protect WordPress Pages
For example: If the user is an administrator or not. There are two steps as pointed out below. You will be adding a function to your theme functions.php file “preferably a child theme” and some code to a custom template you will create.
- Step 1: If the log in user is an administrator they will be redirected to the homepage “wp-admin”.
- Step 2: If the log in user is not an administrator they will be redirect to a page of your choice or the homepage.
- Step 3: Create a custom template and add it to your child theme directory.
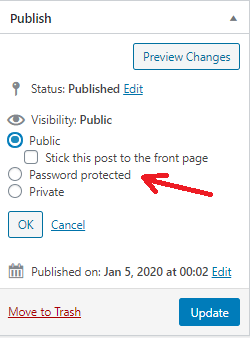
This is one method you can use to protect your pages without using a plugin. Your website will always perform better and faster with less plugins installed and running in your site. However if you don’t feel confortable working with PHP code, you can always use the password protection feature in WordPress as illustrated in the following image. This option also does a great job password protecting your pages and posts.
Note: Always work with a child theme. I am using Suffusion Child Theme for this tutorial, it also allows the usage of different types of templates.
Step 1 ) Before you begin make sure you have the following settings enabled in WordPress, anyone can register and set it to the lowest role which is Subscriber as illustrated in the image below.

Step 2 ) Add the following filter into the functions.php file found in your child theme folder.
The following filter directs all non administrators to a password protected page of your choice and the administrator to the admin dashboard “wp-admin”.
Important: I have moved the add filter outside the function
// Redirect admins to the dashboard and other users elsewhere
function my_login_redirect( $redirect_to, $request, $user ) {
// Is there a user?
if ( is_array( $user->roles ) ) {
// Is it an administrator?
if ( in_array( ‘administrator’, $user->roles ) )
return home_url( ‘/wp-admin/’ );
else
// return home_url();
return get_permalink( 83 );
}
}
add_filter( ‘login_redirect’, ‘my_login_redirect’, 10, 3 );
Remember to change the ID ( 83 ) with the ID of the page you want your non admin users to be redirected too. If you want them redirected to the home page un-comment return home_url(); by removing the two // slashes. You then have to comment out return get_permalink( 83 );. by adding the two // slashes at the beginning of the line.
Note: You can use the code mentioned in wordpress.org codex link f you prefer.
Custom Theme Template
Step 3 ) Create a custom template and upload the template into your child theme folder. Some themes have more than one template to choose from. If that is the case, you can choose which ever template you prefer. Copy and paste the content from the template you chose into the new custom template (Remember to give this template a unique name). When you add a new page or if you already have a page you want to protect, simply choose the custom template you just created from the drop down list.
Step 3-a ) Add the following code to the top of the custom template you just created in the previous step.
Credit is given to the following website require-login-for-wordpress-pages, for the following code.
<?php if(is_user_logged_in()):?>
Step 3-b ) Add the following code at the end of the custom template you created in the previous step.
Note: If you are using a sub domain make sure you point to the correct path or else you will see an error message.
<?php else:
wp_die(‘Sorry, you must first <a href=”../wp-login.php”>log in</a> to view this page. You can <a href=”../wp-login.php?action=register”>register free here</a>.’);
endif;?>
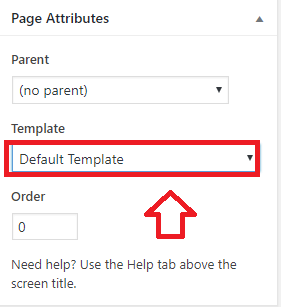
Step 3-c ) The following image Page Attributes allows you to select a different template design for the page if your theme allows it. The image is displaying Default Template. This is where you will click to select the custom template you created above.
Note: Some themes only have one template.
Step 4 ) The following image shows you the message displayed when someone lands on the protected page. They have two options, click on log in or click on register free here.

==========================
That is how simple it is to protect a page in your WordPress site.
Note: You might like to read the following documentation Using Password Protection to learn more about password protecting a post.
If you want more functionality and more control, I recommend the following plugins. Each plugin works differently and has its own functionality and capabilities. Choose the one that works best for you.
Plugins I recommend
I hope you enjoy this tutorial and it helps you. I will be updating this tutorial from time to time to stay up to date.
Enjoy.
WordPress Tutorial List: