How To Manage WordPress Post Publish Box post shows you how to edit and manage the publish box in a post. This instructions also applies to a page.
The Publish Box Contains buttons that control the state of your post. This is also similar with pages. By default when you click on Add New button the the status of the post is set to Draft. The other common status is Published. Draft status means the post has not been published and remains in draft status for the post creator to keep on editing. What this means is that it is not ready for publication. A Published status means the post has been completed, there is no more editing needed at the present and is now live on your site.
How To Manage WordPress Post Publish Box
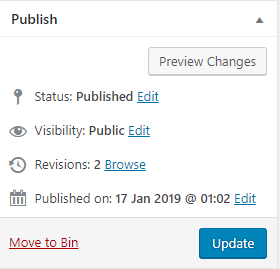
Step 1 ) The following image Publish Box, allows you to manage the following options.
Publish Box Options
- Click on Preview Changes button = Allows you to view the post before publishing.
- Status = (click Edit next to Status)
- Visibility = (click Edit next to Visibility)
- Revisions = (click Browse next to Revisions)
- Published = (click Edit next to Published)
- Click on Move to bin link if you decide to delete the post and want to move it to the bin.
- Click on Update button once you finish editing the post.
Status
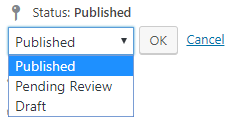
Step 2 ) The following image Status: Published, allows you to manage the following options.
Status Options
- Published
- Pending Review
- Draft
- Click on Ok button when you are happy with your selection.
- Click on Cancel link if you decide not to accept your changes.
Visibility
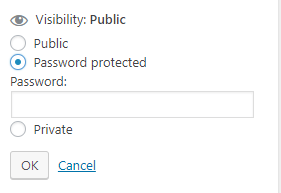
Step 3 ) The following image Visibility: Public, allows you to manage the following options.
Visibility Options
- Public = Public posts will be visible by all website visitors once published.
- Password Protected = Password Protected posts are published to all, but visitors must know the password to view the post content.
- Private = Private posts are visible only to you (and to other editors or admins within your site).
- Click on Ok button when you are happy with your selection.
- Click on Cancel link if you decide not to accept your changes.
Note: You might also like to read the following tutorial How To Password Protect WordPress Pages.
Revisions
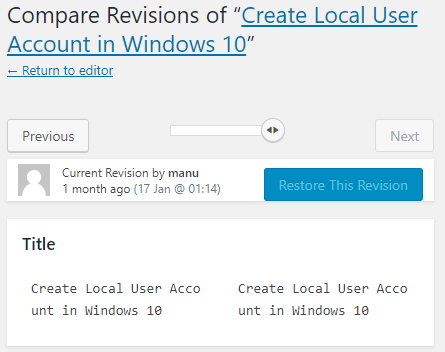
Step 3 ) The following image Revisions, allows you to manage the following options.
Revisions Options
- Click on Return to editor link once you are happy with your selection.
- Click on Previous button to view the previous revision if there is one.
- Click on Next button to view the next revision if there is one.
- Click on Restore This Revision button to restore the revision you have selected using the previous or next button.
- The Title area displays the current revision. This allows to view two different revisions side by side, which gives more flexibility to chose if a previous revision is better than the current revision.
Published
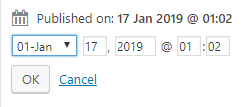
Step 5 ) The following image Published on: 17 Jan 2019 @ 01:02, allows you to manage the following options.
Published Options
- Calendar = This allows you to select the preset date to publish the post. Or you can set the date to the past or the future.
- Day = Change the day.
- Year = Change the year.
- Time = Change the time.
- Click on Ok button when you are happy with your selection.
- Click on Cancel link if you decide not to accept your changes.
===============================
That is how simple it is to manage the post Publish Box.
I hope you enjoy this tutorial and it helps you. I will be updating this tutorial from time to time to stay up to date.
Enjoy.
WordPress Setup Tutorial List: