KompoZer Insert Header Image shows you how to insert a header image to the header.
Last Updated: April 14, 2023
Latest News: I removed a broken link.
In this lesson you will learn how to insert a header image to the header and add the correct image path whether it be relative or static.
KompoZer Insert Header Image Steps
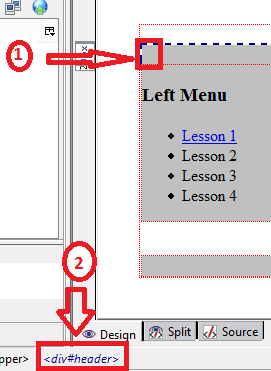
Step 1 ) The following image shows you where you need to click with your left mouse to select <div#header> tag as shown in arrow 2 below.
Note: Make sure you click inside the div tag as shown in arrow 1 below.

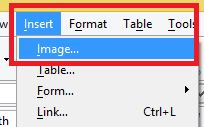
Step 2 ) Click on Insert -> Image to search for the image you want to insert. See image below.

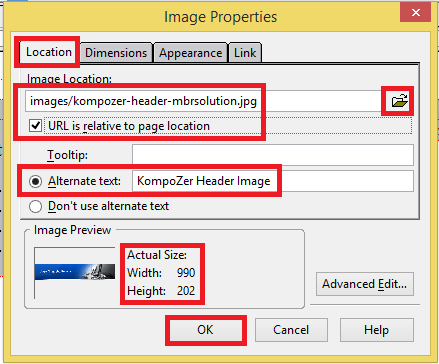
Step 3 ) The following image Image Properties -> Location allows you to set up the following options.
- Image Location = Click on the folder to browse for the image location or you can type the URL path i.e. http://yourwebsite.com/images/imagename.jpg
- URL is relative to page location. In this example the relative path is images/kompozer-header-mbrsolution.jpg (This option is optional. For this example I selected URL is relative….) I don’t encourage relative path. It is always best to select a static path.
- Tooltip
- Alternative text = For this example I added an alternative text KompoZer Header Image
- Don’t use alternative text
- Image Preview = Notice the image size 990 x 202
- Advanced Edit
- Click on OK when you finish adding your image

Step 3-1 ) The following image shows you the path added when you don’t select URL is relative to page location. The following path is added file///E:/….. because this was added from a local laptop. If you were working from a server then you might choose a static path http://yourwebsite.com/images/imagename.jpg. (Note: Your path will be different.)

Step 4 ) The following image shows you the header image added.
Note: The image is sitting nicely in between all the div tags. Remember to resize the images to fit in nicely.

Click on the following URL Borders Tutorial to continue.