Last Updated: June 18, 2016
KompoZer Google Adsense Settings shows you how to setup and add Google Adsense to your website. This can also be applied to other advertising.
Latest News: I have added another link to the menu.
In this tutorial you will learn how to add Google Adsense to your website. The adsense in this example will be added to the right side bar.
Important: You must create a Google Adsense Account.
Optional Intructions:
- You might like to read the following URL How To Setup Google AdSense.
KompoZer Google Adsense Settings Steps
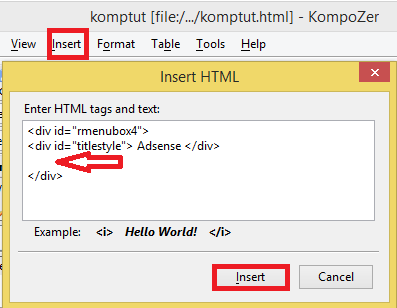
Step 1 ) The following image shows you how to insert Google Adsense code into your web page. Click on Insert -> HTML and insert the code you created if you followed my optional instructions above.
Note: If you try to add the code directly through the Source tab it will break and kompoZer will not add the code.
Another div tag needs to be added to insert Google Adsense code. This div tag will be added to the rightsidebar. This allows you to control the display settings.
You can copy and paste the following div tags. Notice the new id rmenubox4, you will have to add a New Style rule.
Note: Refer to kompozer Left Menu Code if you need help adding CSS style.
HTML Code To Add:
<div id=”rmenubox4″>
<div id=”titlestyle”> Adsense </div>
</div>
If you followed my optional instructions above, copy and paste the code as illustrated with a red arrow in the following image. Make sure the code is inserted in the rightsidebar.
Note: You will have to adjust the height settings to allow for the new div tag rmenubox4 added. I adjusted the height to the following id #wrapper, #mainbody and #rightsidebar and increased it to 750px. In your case this settings might be different.

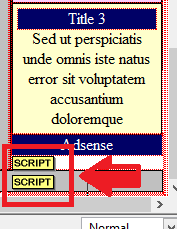
Step 2 ) The following image displays two script tags. If you don’t see the two script tags then you know something went wrong. Return to the top and start again. Make sure that the code is copied correctly.

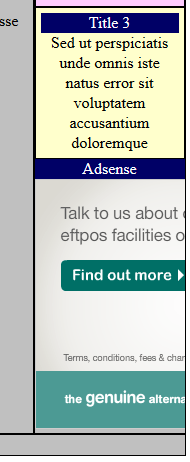
Step 3 ) The following image displays your Google Adsense on the rightsidebar when you view your page through the browser.

Click on the following URL Create Photo Album to continue.