AIOS Plugin User Security Settings helps you setup the following settings WP Username, Display Name and much more.
Last Updated: December 16, 2024
Latest News: Updated the documentation.
When you install WordPress for the first time the admin user created by you or by the automated process creates a user ID and a name that many hackers are aware of. These security vulnerabilities can easily be corrected by using one of the following features pointed out in this tutorial.
The user login feature is also important for site administrators. This allows the administrator to monitor all login activities carried out in the site. In the login page, the attackers will attempt to repeat the login by trying to guess the username and password. They will carry out this action until they succeed. This is considered to be a brute force attack.
Some of you might also allow people to register in your site via the front-end. If that is the case then you probably want to control and minimize spam registration. By activating the manual approval feature, it allows you to manually control who registers into your site. All new registrations will be automatically set to “pending” until the administrator activates them.
Note: When you install WordPress for the first time, the first admin user name added during the setup is given an ID of 1. The ID of 1 is well known by hackers world wide. A simple solution to change the ID number is to add a second admin user and delete the admin user account with ID of 1. The new admin user will have a different ID number added to the account.
What you need:
AIOS Plugin User Security Settings
Step 1 ) Go to WP Security -> User Security admin sidebar as illustrated in the image below.
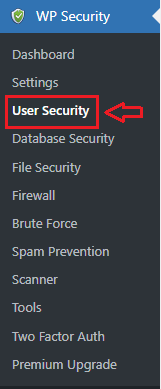
User Security
Step 2 ) The following image User Security allows you to setup the following settings.
User Security Settings
- User accounts
- Login lockout
- Force logout
- Logged in users
- Manual approval
- Salt
- HTTP authentication
- Additional settings

User accounts
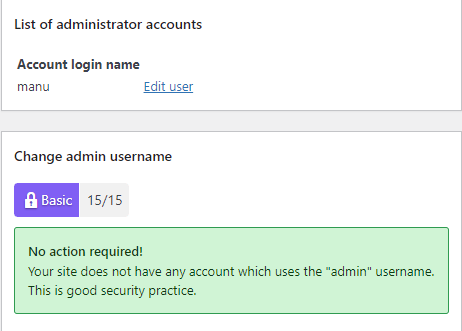
Step 3 ) Go to WP Security -> User Security -> User accounts tab to check the WP usernames in your website. If your settings are correct you will receive the following message.
No action required!
Your site does not have any account which uses the default “admin” username. This is good security practice.
This will add another 15 points score towards your security meter. (Basic Security Level)
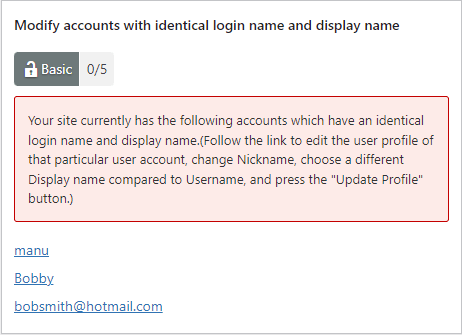
Step 3-a ) The following image allows you to check if the display name and the login name for all your WP users are identical. If your accounts have identical login names and display names, you will receive the following message. The following image has three accounts that have identical login and display names manu, Bobby and [email protected].
Your site currently has the following accounts which have an identical login name and display name.(Follow the link to edit the user profile of that particular user account, change Nickname, choose a different Display name compared to Username, and press the “Update Profile” button.)
This will add another 5 points score towards your security meter. (Basic Security Level)
Note: You might like to check the following URL How To Add New Users To Your WordPress Site Manually to learn more about users display name.
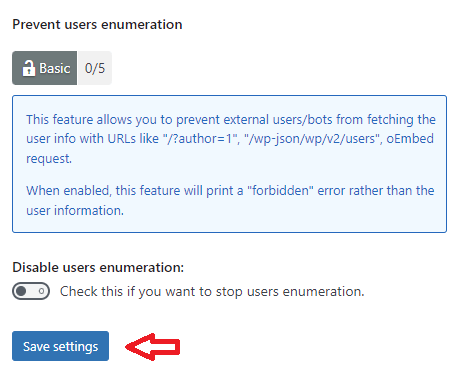
Step 3-b ) The following image allows you to activate the following option.
Prevent users enumeration Option
- Disable users enumeration:
- Click on Save Settings button once you complete this option.
================================
Login Lockout
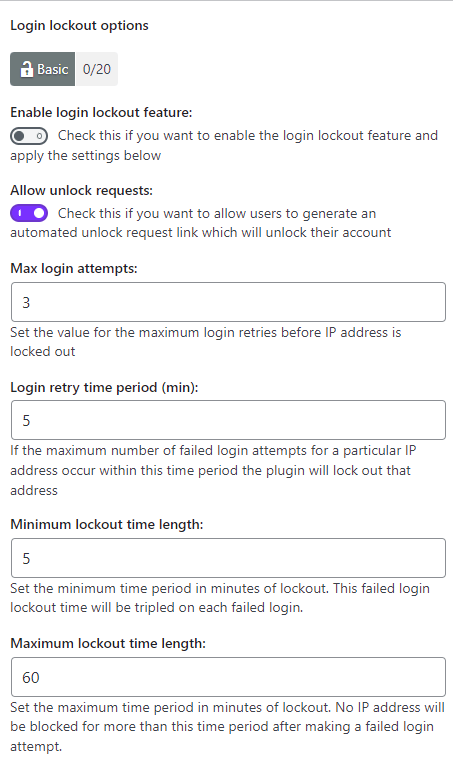
Step 4 ) Go to WP Security -> User Security -> Login lockout tab to set up the following options as illustrated in the image below.
This will add another 20 points score towards your security meter. (Basic Security Level)
Note: Go to WP Security -> Dashboard -> Locked IP Addresses tab to see any IP addresses which is temporarily locked out due to the Login Lockdown feature.
Login Lockout Part 1
- Enable login lockout feature:
- Allow unlock requests:
- Max login attempts: = If you get too many lockouts from your users login in, then you might consider enabling Allow Unlock Request.
- Login retry time period (min):
- Minimum lockout time length:
- Maximum lockout time length:
Remember: Always check your Account Activity Logs and Logged In Users to know more about what’s happening on your sites admin panel. Checking Logged In Users can be handy. If anyone is logged in, you can notify them if you are going to carry out any updating on your site.
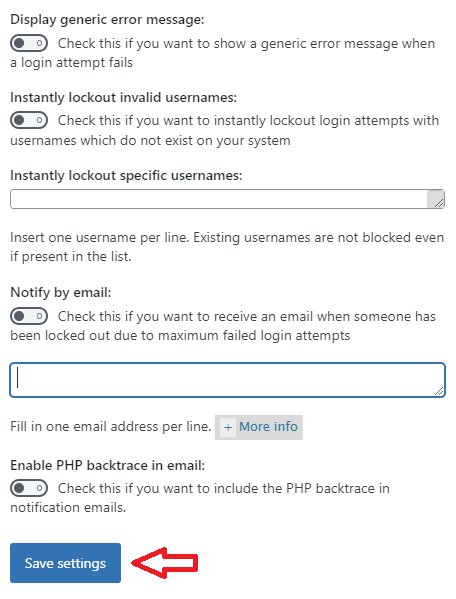
Step 4-a ) The following image allows you to set up the following options.
Login Lockout Part 2
- Display generic error message: = Check the following steps Step 4-b ) and Step 4-c ) below for more information.
- Instantly lockout invalid usernames:
- Instantly lockout specific usernames: = In this example the following usernames have been added to the list admin, www, bpm-go, bpmgo. This features comes in handy when you keep getting too many strange usernames trying to log into your site.
- Notify by email:
- Enable PHP backtrace in email:
- Click on Save settings button once you have completed the settings.
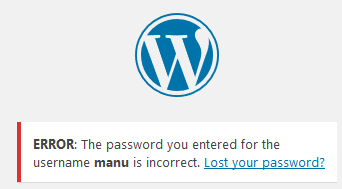
WordPress Default Error Message
Step 4-b ) The following image displays WordPress default error message.
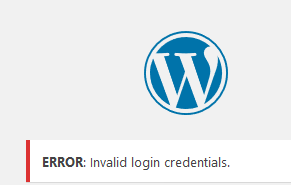
 Step 4-c ) The following image displays a generic message when the following feature Display Generic Error Message is enabled.
FAQ WordPress Default Error Message
Q1 Is there a way to customize the default error message displayed by WordPress?
Answer: Yes you should be able too by using the wordpress core filter for the errors. Check the following support thread for the solution.
Lost your password link
AIOWPS plugin also does a great job at protecting the Lost your password? link. If you are using one of the Brute Force features to rename the login URL, you must use the URL with the secret word to reset your password. If you don’t you will see an error message displayed on the screen. Also, the email sent to your inbox will also have the correct reset link as long as the person resetting the password is an administrator with administrative privileges.
================================
Login Lockout IP Whitelist Settings
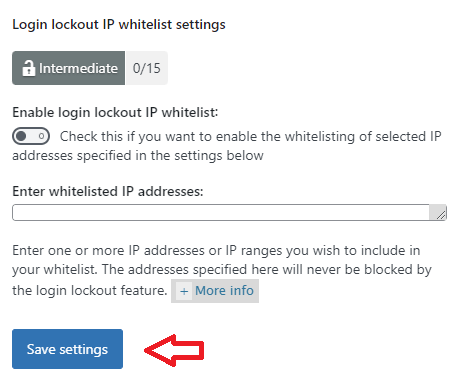
Step 5 ) Go to WP Security -> User Security -> Login lockout -> Login lockout IP whitelist settings as illustrated in the image below to set up the following options.
This will add another 15 points score towards your security meter. (Intermediate Security Level)
Login Lockout IP Whitelist Settings
- Enable login lockout IP whitelist:
- Enter whitelisted IP addresses:
- Click on Save settings button once you have completed the settings.
Troubleshooting Login Lockout
Q1 The following error message is displayed when someone has been locked out of your site when the following feature Enable Login Lockout Feature is enabled.
ERROR: Access from your IP address has been blocked for security reasons. Please contact the administrator.
Solution: (Provided by wpsolutions in the forum)
– manually deactivate this plugin via FTP or log into your server and temporarily rename the plugin’s folder. Then once you are logged into your site, you can rename the folder back to it’s original name and unlock your self from the “Locked IP Addresses” tab in the aiowps dashboard menu.
OR,
1) If you have the login white list feature enabled? Try editing the .htaccess file manually and delete the block of code for that feature. (look for the markers “#AIOWPS_LOGIN_WHITELIST_START/END”)
2) Using PHPMyAdmin, go to the “aiowps_permanent_block” table and check if your IP address is listed in it. If it is delete that row.
3) Do the same as step 2) above for the table called “aiowps_login_lockdown“
===============
Q2 I enabled cookies brute force to prevent wp-admin. After login with the wrong password several times I am finally lockout from my admin Dashboard. When I disabled the plugin from wp directory I am able to login but once enable the plugin again it locks me out again. Why is that?
Solution: Check the following support thread for a possible solution.
================================
Force Logout
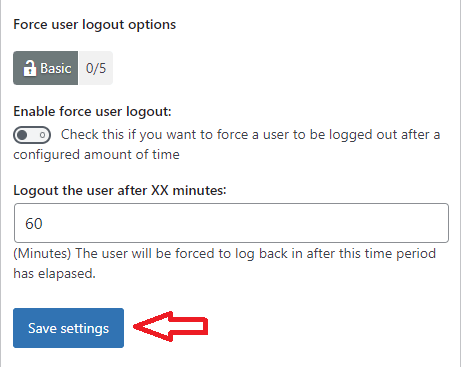
Step 6 ) Go to WP Security -> User Security -> Force logout tab to setup the following options as illustrated in the image below. The following security option is very useful. If you don’t want your users to stay logged in for too long you can set the time here in minutes. In this example the time is set to 60 minutes “1 hour”.
This will add another 5 points score towards your security meter. (Basic Security Level)
Force User Logout Options
- Enable force user logout:
- Logout the user after XX minutes:
- Click on Save settings button once you have completed the settings.
Logged In Users
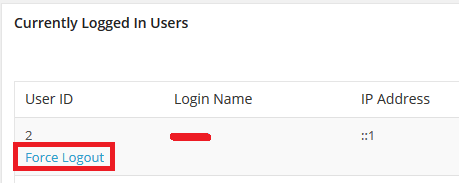
Step 7 ) Go to WP Security -> User Security -> Logged in users tab to check all the users that are currently logged into your website and allows you to Force Logout the user especially if you think or know it is a suspicious user. The following information is displayed for your perusal.
- User ID = Force Logout
- Login Name
- IP Address
Troubleshooting Logged In Users
Q1 When I log into my site, I see the same logged in user twice. Why is that?
Solution: Check the following support thread for a possible solution.
=============================
Manual Approval
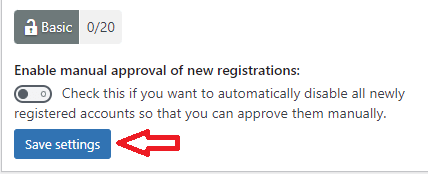
Step 8 ) Go to WP Security -> User Security -> Manual approval tab to setup the following option as illustrated in the image below.
Extra Features
- Enable manual approval of new registrations:
- Click on Save settings button once you have completed the settings.
This will add another 20 points score towards your security meter. (Basic Security Level)
Troubleshooting manual approval
Q1 When “Enable manual approval of new registrations” is enabled and I am locked out, I cannot create a new admin user without the approval from the old admin (which is not possible). I want to approve the new user either through the Database or through the wp.cli command.
Answer: You can approve the relevant user via the DB. Follow these steps.
– Using PHPMyAdmin or similar, look inside the “usermeta” table and find the row for the user_id you are interested and where meta_key is equal to “aiowps_account_status“.
– When you find the row, set meta_value to approved.
===============
Q2 What happens if I select and delete all these extra submissions? will their unapproved user account get deleted from the user area?
Answer: Yes.
===============
Q3 When the admin goes into the moderation queue and approves someone, the new user gets an email which simply says “Your account with username: [MyUserName] is now active”.
Is there a hook which allows you to change the default e-mail text?
Answer: Yes, there are a couple of filters which deal with the email subject and the email text body. Check the following forum post for more information.
FAQ manual approval
Q1 Is there any functions or filters that can trigger user approval programmatically? This is to alter the Login for plugins like VIPPS “A Norwegian Banking application” plugin etc.
Answer: Yes there is. Check the following forum post for more information.
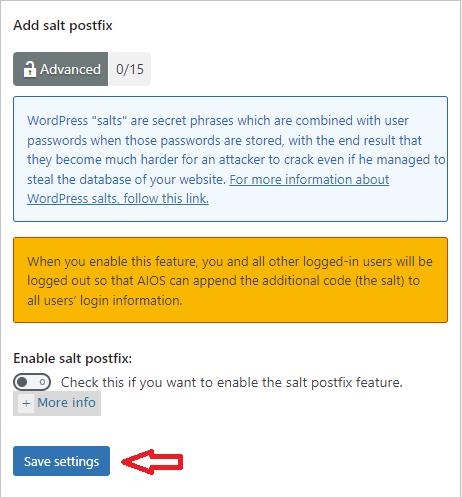
Salt
Step 9 ) Go to WP Security -> User Security -> Salt tab to setup the following option as illustrated in the image below.
Add salt postfix option
- Enable salt postfix:
- Click on Save settings button once you have completed the settings.
This will add another 15 points score towards your security meter. (Advanced Security Level)
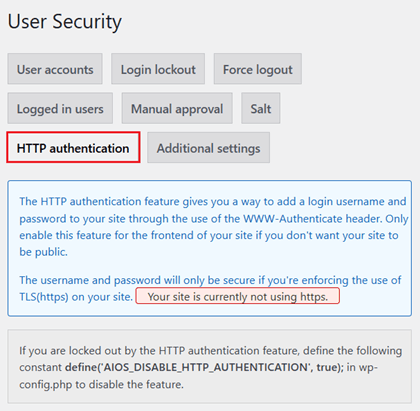
HTTP authentication
Step 10 ) Go to WP Security -> User Security -> HTTP authentication tab as illustrated in the images below.
Note: Make sure you read the information regarding this feature before you go ahead and enable it. There is also a way to unlock yourself in case you get locked out when you enable this feature.
This will add another 10 points score towards your security meter. (Basic Security Level)
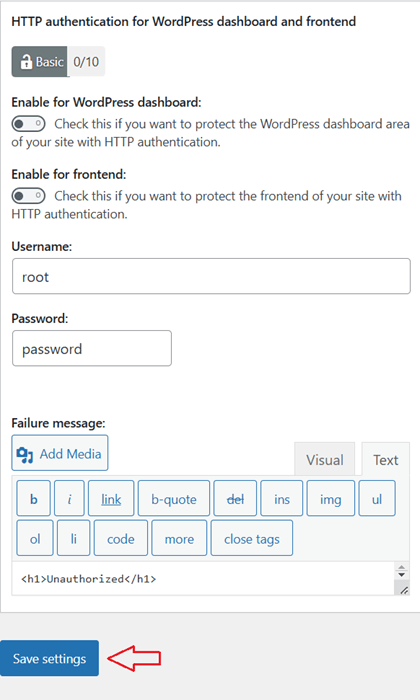
Step 10-a ) The following image HTTP authentication for WordPress dashboard and frontend allows you to setup the following options.
Enable HTTP authentication options
- Enable for WordPress dashboard:
- Enable for frontend:
- Username:
- Password:
- Failure message:
- Click on Save settings button once you have completed the settings.
Additional Settings
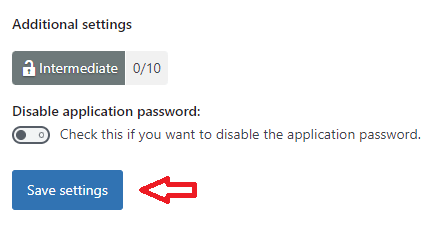
Step 11 ) Go to WP Security -> User Security -> Additional settings tab to manage the application password option in the site.
This will add another 10 points score towards your security meter. (Intermediate Security Level)
Additional Settings Option
- Disable application password:
- Click on Save settings button once you have completed the settings.
=============================
I hope the above information helps you protect your site from spam and bogus registrations.
If you have any questions please let me know
Enjoy.
All In One Security (AIOS) Plugin Tutorial List