Adding Sites Locally WordPress Multisite shows you how to create new sites and add them to your multisite network and more.
Last Updated: March 27, 2019
Latest News: I update the information below.
The following instructions will show you how to add new sub sites to your network set up. The following tutorials provide information on the following topics.
- How to run a multisite.
- How to add sites.
- Install plugins.
- Install theme.
- Manage a multisite
- and more….
WordPress Multisite Setup Tutorials
- Setup WordPress Multisite Locally Using Xampp
- Adding Sites Locally WordPress Multisite
- securing WordPress multisite with AIOWPS plugin
- More (Coming Soon)
Adding Sites Locally WordPress Multisite
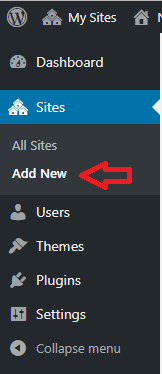
Step 1 ) Go to My Sites -> Network Admin -> Sites -> Add New as illustrated in the following image. This allows you to add, manage and control the sub sites added to your multisite set up.
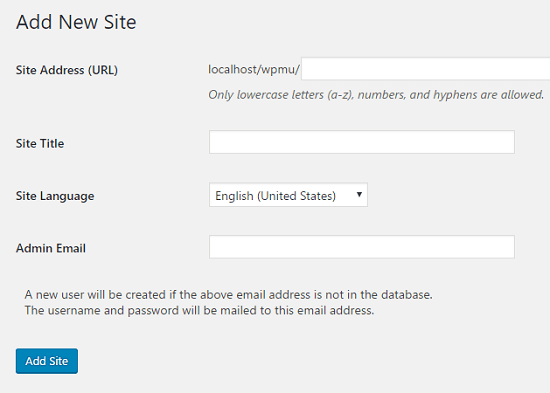
Step 2 ) The following image Add New Site allows you to manage the following options when adding a sub site to your network.
New Sub Site Options
- Site Address (URL) = Notice in this example the site URL begins with localhost/wpmu/. This is where this network installation was first set up.
- Site Title
- Site Language
- Admin Email
- Click on Add Site button once you have completed your set up.
Step 3 ) The following is displayed once you have added a site to your network. From here you can click on the following links.
- Visit Dashboard
- Edit Site

When you click on the Visit Dashboard link you will be sent to a normal WordPress admin panel. If you check the browser address bar you will notice the new site address added to the URL. In this example the following sub site was created Network Test 1.
[http://localhost/wpmu/network-test-1/wp-admin/]
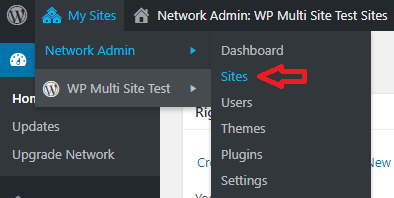
Step 4 ) Go to My Sites -> Network Admin -> Sites as illustrated in the following image. This allows you to view and manage all the site currently added to your multisite set up.
Step 5 ) The following image is displaying all the sites added to your network. Notice that you can’t delete the admin site localhost/wpmu. You can delete and manage any sub site added to the network. This is one way of protecting the admin site from accidentally being deleted by a super admin.
When you move your mouse over any of the sites in the list you will be able to carry out the following actions. Remember the options are different between the admin site and the sub site as pointed out in the list below.
Admin Site
- Edit
- Dashboard
- Visit
Sub Sites
- Edit
- Dashboard
- Deactivate
- Archive
- Spam
- Delete
- Visit
Warning: The Spam and Delete options are highlighted in red. These options can delete a site or move the site to spam. So be careful when you click on these options.

Install And Network Activate A Plugin
It is time to install the first plugin and network activate it from your network admin panel. This is done exactly the same way like when you install a plugin in your normal WordPress site.
Step 6 ) The following image shows you the following plugin All In One WP Security & Firewall installed but not yet activated. This is a great security plugin and one that I highly recommend. I always think a security plugin should be one of the first plugins you install in WordPress site.
Note: Because this is a network setup you get a different button. In the following image you can see Network Activate button instead of your normal Install Now button from a standard WordPress installation.

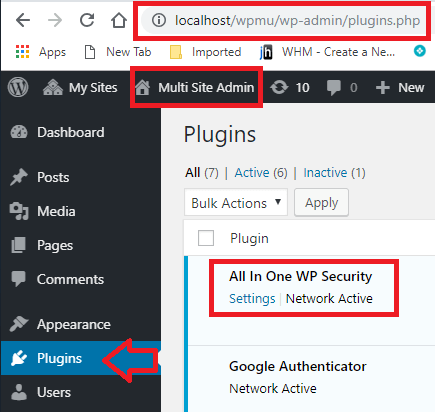
Step 6-a ) The following image shows you the plugin AIOWPS is installed and Network Active. This is viewed from the admin site. The following information lets you know that you are currently viewing the network admin site.
Network Admin Site
- The browser is displaying the following URL localhost/wpmu/wp-admin/plugins.php. This URL belongs to the network admin site. If I was looking at the plugin in one of the sub sites, the URL would be localhost/wpmu/network-test-1/wp-admin/plugins.php. Notice how I changed the sub site URL in red, to let you know that the URL is different to the admin site.
- You can also see the following Multi Site Admin. I renamed the admin site to make it more clear so you know what I am talking about.
- And you can see the plugin Network Active.
That is how simple it is to network install a plugin.
I will be updating this post from time to time.
If you have any questions please let me know.
Enjoy.
Return to WordPress Multisite Tutorials