JobRoller WordPress Theme Admin Settings post will show you how to setup and manage the admin dashboard settings and more.
Last Updated: April 23, 2019
Latest News: I updated the documentation.
In this post you will learn how to set up JobRoller admin menu dashboard and other settings. You will also learn about security, jobs, resumes, system info and more. There are some tutorials found under JobRoller -> Dashboard tab for you to learn more about the theme.
JobRoller WordPress Theme Admin Settings
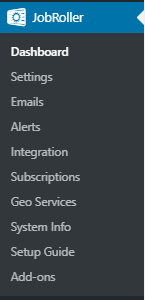
Step 1 ) The following image JobRoller admin menu displays different tabs that allow you to manage, enable and activate different options in the theme. The following list of tabs will help you get started.
JobRoller Admin Menu
- Dashboard
- Settings
- Emails
- Alerts
- Integration
- Subscriptions
- Geo Services
- System Info
- Setup Guide
- Add-ons
Dashboard
Step 2 ) Go to JobRoller -> Dashboard to check up on the following information. This information helps you keep track of what is happening in your site and much more. It is a good idea to check the dashboard every time you log into your site.
Dashboard
- Overview
- Last 30 Days
- News
- Market Place
- Forums
- Tutorials
Settings
Step 3 ) Go to JobRoller -> Settings to set up the following options.
Settings
- General
- Jobs
- Resumes
- Security
- Advertising
- Advanced
General Settings
Step 3-a ) The following Settings -> General allows you to set up the following options.
Appearance
- Design
Social
- Feedburner URL
- Twitter ID
- Facebook ID
- ShareThis ID
- Analytics Code
Jobs Settings
Step 3-b ) The following Settings -> Jobs tab allows you to set up the following options.
General
- Editing
- Relisting
- Listing Period
- Home Page
- Jobs Per Page
- Switch Categories
Pricing
- Charge for Listings
- Job Plans
New Listings
- How to Apply
- Job Salary
- Job Categories
Listing Page
- Views Counter
- Allow HTML
- Applicants
- Allow Comments
- Expired Jobs
Featured
- Home Page
- Featured Per Page
- Sorting
Moderate
- Listings
- Edited Jobs
- Click on Save Changes button when you finish your settings.
Resumes Settings
Step 3-c ) The following Settings -> Resumes tab allows you to set up the following options.
General
- Resume Listings Visibility
- Resume Visibility
- Resumes Per Page
- Resume Privacy
Pricing
- Resume Plans
Recruiters
- Enable
Job Seekers
- Enable
- My Profile
- Submit Resume
Subscriptions
- Enable
- Notice
- Click on Save Changes button when you finish your settings.
Security Settings
Step 3-d ) The following Settings -> Security tab allows you to set up the following options.
General
- WP-Admin
reCaptcha
- Public Key
- Private Key
- Theme
- Registration
- Contact Form
- Apply Online Form
Anti-Spam
- Question
- Answer
- Click on Save Changes button when you finish your settings.
Advertising Settings
Step 3-e ) The following Settings -> Advertising tab allows you to set up the following options.
Header Ad (468×60)
- Enable
- Code
Content Ad (468×60)
- Enable
- Code
- Click on Save Changes button when you finish your settings.
Advanced Settings
Step 3-f ) The following Settings -> Advanced tab allows you to set up the following options.
User
- Set Password
- Terms & Conditions
- Disable Toolbar
Developer
- Debug Mode
- Hide Version
- Debug Log
- Click on Save Changes button when you finish your settings.
Emails Settings
Step 4 ) Go to JobRoller -> Emails to set up the following options.
Emails Settings
- General
- New User
Step 4-a ) The following Emails -> General tab allows you to set up the following options.
Admin
- Recipient
- New User
- New Job
- Job Applications
User
- Approved Job
- Expired Job
- Click on Save Changes button when you finish your settings.
Step 4-b ) The following Emails -> New User tab allows you to set up the following options.
New User Settings
- Enable
- Name
- Subject
- Allow HTML
- Body
- Click on Save Changes button when you finish your settings.
Alerts Settings
Step 5 ) Go to JobRoller -> Alerts to set up the following options.
Emails Settings
- General
Step 5-a ) The following Alert -> General tab allows you to set up the following options.
Job Alerts
- Enable
- Batch Size
- Job Limit
- Frequency
RSS Feed
- Enable
- Click on Save Changes button when you finish your settings.
Step 5-b ) The following Alert -> Email tab allows you to set up the following options.
- From
- Subject
- Allow HTML
- Template
Standard Template
- Body Message
- Body Jobs
Testing
- Enable
- Click on Save Changes button when you finish your settings.
Integration Settings
Step 6 ) Go to JobRoller -> Integration -> Indeed to set up the following options.
General
- Enable
- Publisher ID
- Channel Name
- CSS Class
Jobs
- Limit
- Cache
- Type
- Sort Order
- Criteria
- Mapping
- Keywords
Display Results
- Home Page
- Listings
- Search
- Position
- Click on Save Changes button when you finish your settings.
Subscriptions Information
Step 7 ) Go to JobRoller -> Subscriptions to view the following information.
Subscriptions Information
- Resumes
- Alerts
System Info
Step 8 ) Go to JobRoller -> System Info to set up the following options.
System Info
- System Info
- Cron Jobs
- Advanced
Step 8-a ) The following System Info -> System Info tab displays information about the theme settings, your site specification and more. This can help you troubleshoot some of the issues you might run into.
System Info
- Theme Info
- WordPress Info
- Server Info
- Image Support
- Other Checks
- Active Plugins
- Theme Log
- You can click on Download Report button if you want to keep a report of your system information locally in your computer.
Step 8-b ) The following System Info -> Cron Jobs tab list information about all the cron jobs running in your site.
You can click on Download Report button if you need to keep a report of the cron jobs running in your site.
Step 8-c ) The following System Info -> Advanced tab allows you to set up the following options.
Uninstall Theme
- Database Table
- Config Options
Setup Guides
Step 9 ) Go to JobRoller -> Setup Guides to view information that helps you get started with JobRoller theme. You can even read some tutorials and also get involved with development and translations.
The following is a list of options available for you to start managing JobRoller theme and also get involved.
Getting Started
- General Settings
- Look and Feel
- Payment Settings
- Automatic Updates
- Marketplace Addons
- Get Support
Get Involved
- Developers
- Translators
Addons
Step 10 ) The Addons tab provides you with a huge list of addons for different functionalities for your site. I am sure you will find an addon that suits your needs.
That is how simple it is to setup and manage JobRoller admin menu settings.
If you have any questions or suggestions please leave a comment.
There will be more tutorials coming soon. So make sure you keep coming back for the latest.
Enjoy.
JobRoller Theme Tutorial List: