Android Security Device Administrators shows you how to set up, erase and protect your personal details in case you loose your mobile phone.
Last Updated: August 14, 2017
Latest News: I have added another link to the menu below.
This tutorial will show you how to secure your data and personal details in your mobile phone in case you loose, misplace or your Smartphone is stolen.
For this tutorial I used BenQ Agora 4G Pro running Android 5.1.1. However these instructions can be applied to any mobile phone running an Android operating system.
Android Security Device Administrators Steps
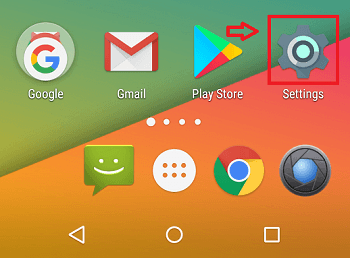
Step 1 ) In the following image click on Settings, to manage and set up all your Android system settings.
Note: Depending on your mobile device the settings icon might be different or located in a different area.
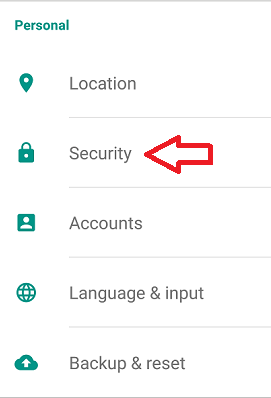
Step 2 ) In the following image click on Security.
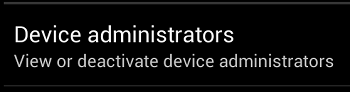
Step 3 ) The following image Device administrators, allows you to select how you want your device administered.
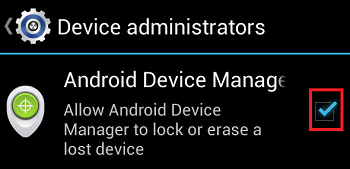
Step 4 ) In the following image Android Device Manager is enabled. This allows you to to control how your Google account will manage your device.
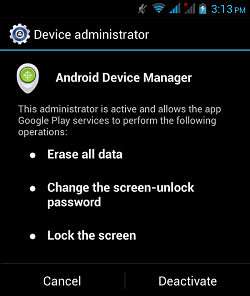
Step 5 ) The following image Android Device Manager lets you know that the administrator is active and what options can be carried out.
Options
- Erase all data
- Change the screen-unlock password
- Lock the screen
- You can also Cancel or Deactivate this option.
Google Account Login
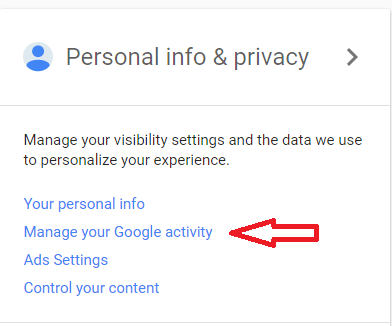
Step 6 ) Once you log into your Google account, go to Personal info & privacy and click on Manage your Google activity.
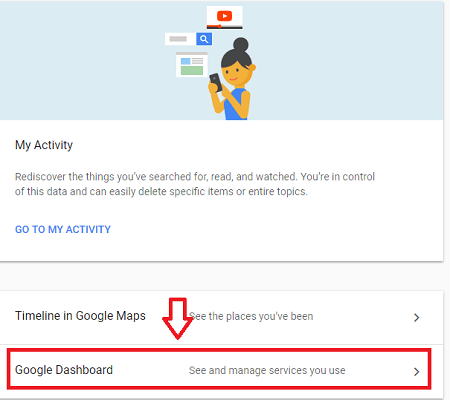
Step 7 ) Click on Google Dashboard as illustrated in the following image.
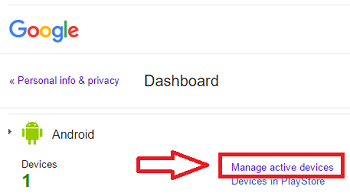
Step 8 ) Once you are viewing your Dashboard, click on Manage active devices.
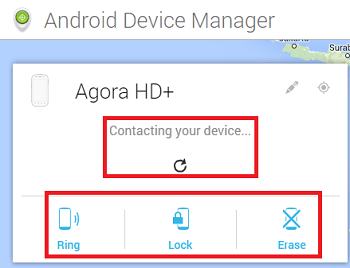
Step 9 ) Once you clicked on Manage active devices mentioned above, your Android device/s will be displayed. You have the following options to carry out.
- A display of where the device is located
- Ring = You can ring the device.
- Lock = This allows you to lock the device if you have misplaced it or lost it.
- Erase = This allows you to delete all your personal details and other data found in the device.
Remove Devices From Google Account
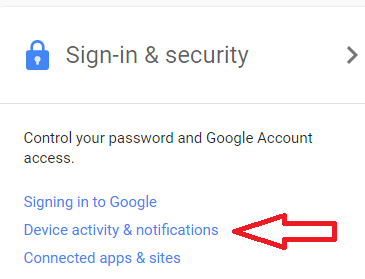
Step 10 ) While you are still logged into your Google account, go to Sign-in & security. Click on Device activity & notifications as illustrated in the image below.
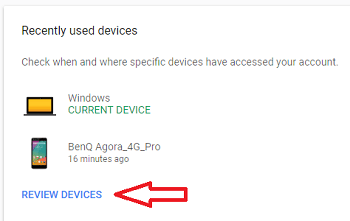
Step 11 ) Go to Recently used devices and click on Review Devices as illustrated in the following image.
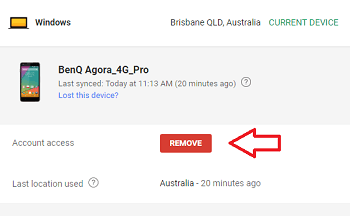
Step 10 ) View your devices and select which device you want to remove and click on Remove button as illustrated in the image below.
That is how simple it is to secure your personal details on your Smartphone.
Click on the following URL How To Sync Google Birthdays To Android Calendar to learn more.
If you have any questions please let me know. I will be updating this from time to time. So keep coming back for the latest update.
Enjoy.
Android Tutorials List: