WP Photo Seller E-mail Gateway Settings tutorial will show you how to set up and configure e-mail settings, payment gateway settings and autoresponder settings and more.
Last Updated: September 8, 2021
Latest News: Updated the documentation.
What you need:
- WP Photo Seller (Note: This is an affiliated link = I get a small commission if you make a purchase.)
WP Photo Seller Email Gateway Settings Steps
Step 1 ) Click on WP Photo Seller -> Settings -> Email Settings to set up the following. Once you have completed the settings click on Save Email Settings button. See images below.
Email Notification Settings:
- Email Address
- Email From
- Send Email After Purchase
- Buyer Email Subject
- Buyer Email Body

Step 2 ) The following image allows you to set up the following.
- Send Email to Seller After Purchase
- Seller Notification Email
- Seller Email Subject
- Seller Email Body

Step 3 ) The following image allows you to set up the following.
- Send Email When An Order Is Pending
- Email Subject
- Email Body

Step 4 ) The following image allows you to set up the following.
- Send Email When Order Is Shipped
- Email Subject
- Email Body
- Send Email For Refund Event
- Email Subject
- Email Body
- Include Email Signature
- Email Signature

Step 5 ) Click on WP Photo Seller -> Settings -> Payment Gateway Settings to set up the following. See image below.
PayPal Settings:
- Use PayPal Standard Checkout
- PayPal Email

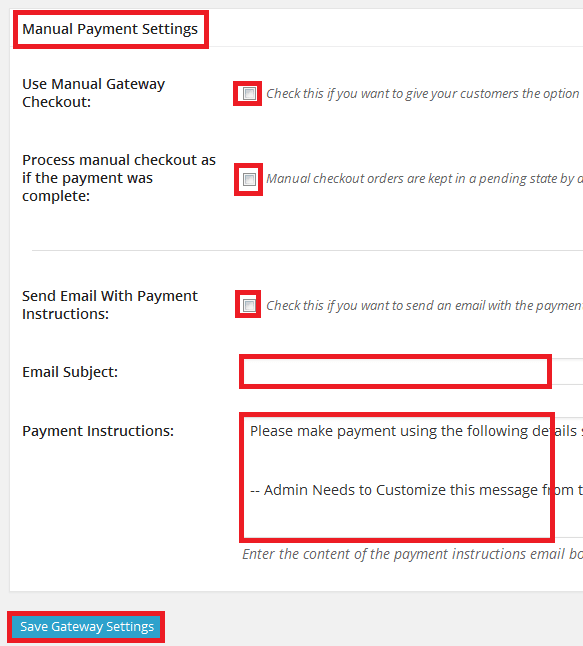
Step 6 ) The following image allows you to set up the following.
Manual Payment Settings:
- Use Manual Gateway Checkout
- Process manual checkout as if the payment was complete
- Send Email With Payment Instructions
- Email Subject
- Payment Instructions
- Click on Save Gateway Settings button
Step 7 ) Click on WP Photo Seller -> Settings -> Autoresponder Settings to set up the following. See images below.
MailChimp Settings:
- Enable MailChimp Integration
- MailChimp List Name
- MailChimp API Key
- Disable Double Opt-In
- Signup Date Field Name (Optional)

Step 8 ) The following image allows you to set up the following. Make sure once you have finished settings up AWeber you click on Make Connection button.
AWeber Settings:
- Enable AWeber Integration
- AWeber List Name
- Configure AWeber API. Make sure you click on the following link (Click here to get your authorization code)
- Paste in Your Authentication Code
- Hit the following “Make Connection” Button

Step 9 ) The following image allows you to set up the following. Make sure once you have finished settings up GetResponse you click on Update button.
GetResponse Settings:
- Enable GetResponse Integration
- GetResponse Campaign Name
- GetResponse API Key

Click on the following link Advanced Settings to complete the tutorial.
I will be updating this post from time to time. So keep coming back for more.
Enjoy.
WP Photo Seller Tutorials
Does WP Photo Seller automatically send the purchased digital images to the buyer? Or is there a third party product that has to be integrated? Or does the seller have to email the purchased photos to the buyer after a purchase?
Hi Caryn little, yes the plugin sends the digital images automatically once they have paid for the digital images and the money has been received. If you need more information please let me know.
Kind regards