Disable WordPress Plugins From Loading shows you how to disable and enable plugins from loading in pages and post.
Last Updated: October 12, 2023
Latest News: Updated the document.

This plugin is very powerful and flexible. You do need some knowledge to understand the functionality of the plugin. I suggest that you spend some time understanding how to set this plugin before you go live.
This tutorial will guide you and help you disable your contact form plugin from loading on your all your pages and or posts. Then you will learn how to enable the contact form plugin in one page Contact Us page.
Disabling some plugins from loading in pages and posts improves the loading speed. This helps to improve your SEO with search engines like Google.
Note: Save and test your settings before you go live.
Plugin Organizer changelog version 10.1.10
- Fixed PHP warning about array offset when the database returns a bad result in MU plugin
What You Need
Disable WordPress Plugins From Loading
Step 1 ) Install and activate the plugin like you normally do. Click on the following URL How To Install WordPress Plugins to learn how to install a plugin.
Step 1-a ) The following image displays the warning message the developer has added. This is because too many keep running into issues when organizing the plugin settings. Please read this warning message and make sure you understand the consequences if something goes wrong.

Step 2 ) Click on Plugin Organizer tab on the sidebar to set up the following options. For this post you will only be editing Settings and Global Plugins.
- Settings
- Global Plugins
- Search Plugins
- Post Type Plugins
- Group And Order Plugins
- Filter Groups
- Plugin Filters

==============================
Step 3 ) Go to Plugin Organizer -> Settings tab to set up and manage the following options. For this tutorial you will only be working with General Settings.
- General Settings = This option only.
- Admin CSS
- Recreate Permalinks
- Mobile User Agents
- Manage MU plugins file

General Settings Options
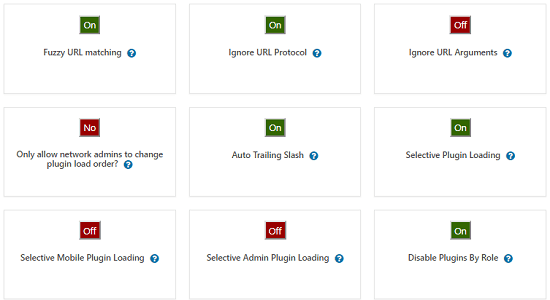
Step 4 ) Go to Plugin Organizer -> Settings -> General Settings tab to set up the following options. You can see which features I have enabled and which ones I have not. It is up to you to choose which one works best for your site. However you must enable Selective Plugin Loading.
General Settings Options
- Fuzzy URL matching = On
- Ignore URL Protocol = On
- Ignore URL Arguments = Off
- Only allow network admins to change plugin load order? = No
- Auto Trailing Slash = On
- Selective Plugin Loading = On (You must enabled this feature for the plugin to work.)
- Selective Mobile Plugin Loading = Off
- Selective Admin Plugin Loading = Off
- Disable Plugins By Roles = On
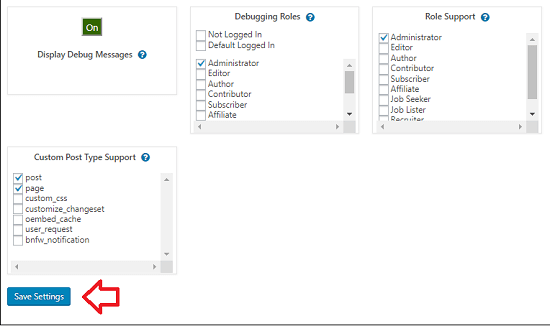
Step 4-a ) The following image allows you to control and manage the following options. You can see which features I have enabled and which ones I have not. It is up to you to choose which one works best for your site.
- Display Debug Messages = On
- Debugging Roles = Set to Administrator
- Role Support = Set to Administrator
- Custom Post Type Support = Enabled Post and Page (This option is important because it allows you to control which plugins loads in pages and posts.)
- Click on Save Settings button once you have completed your settings.
==============================
Global Plugins Settings
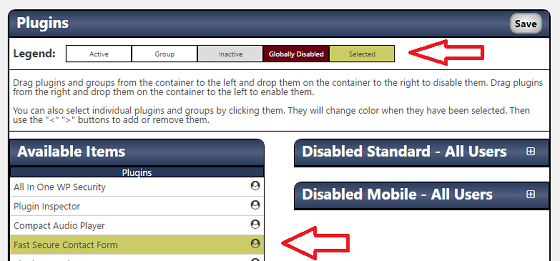
Step 5 ) Go to Plugin Organizer -> Global Plugins tab to manage and organize the plugins through the global settings. This tab allows you to control the plugins you want to enable or disable globally in your site. Any plugin added here will be disabled globally in all the pages and posts and will not function.
Note: Remember the Legend.
Legend
- Active
- Group
- Inactive
- Globally Disabled = You will see the following button Selected next with a color. This lets you know that any plugin you globally select will be highlighted with the same color.
Disable Standard And Mobile Settings
Here you can disable a plugin or plugins, simply by using your mouse select and drag any of the plugins displayed in the list and dropping them to the Disabled Standard area and or the Disabled Mobile area as illustrated below in the second image.
For this tutorial the following plugin Fast Secure Contact Form will be disabled from all the pages and post and only enabled in the Contact Us page.
Example Available Plugins
- All In One WP Security
- Plugin Inspector
- Compact Audio Player
- Fast Secure Contact Form = This is the current contact form that is active. This plugin is going to be disabled from all posts and pages except from the Contact Us page.
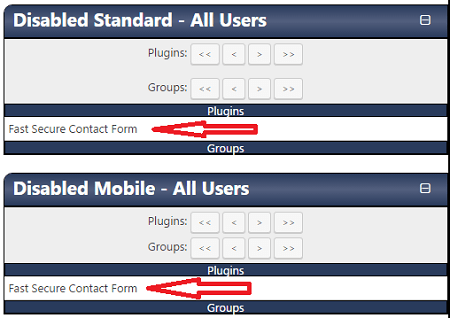
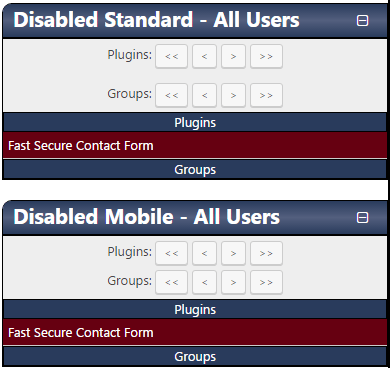
Step 5-a ) The following image shows you two different areas that allows you to control where the plugins will be disabled from. It also displays the plugin Fast Secure Contact Form, which has been disabled globally from the standard and mobile areas.
- Disabled Standard – All Users
- Disabled Mobile – All Users = Remember you also need to enable Selective Mobile Plugin Loading under Settings as pointed out in Step 3 ) above.
Note: You can add as many plugins and groups to both areas above. And you can remove all at once if you want.
==============================
Enable Plugin On Page
Step 6 ) Once you have set up the above, go and edit the page in question which in this case is Contact Us page. Scroll to the bottom of the page and you will see the following settings as illustrated in the image below. But this time the plugin in question Fast Secure Contact Form is in red. The reason why the plugin is highlighted in red is because currently it is disabled globally. In this settings, you need to drag and drop the plugin back to Available Items Plugins list. Once that is done make sure you save your settings and view the page in question. For this example the contact form is displayed again in the Contact Us page. This tells me that the plugin is only working in this page and not the other pages and posts.
Note: This improve the loading of other pages and posts, which is great for SEO.
The above instructions is very simple and easy to follow. Now you know how to disable a plugin from loading in all the other pages and posts except for the page in question in your site.
These steps can be used to manage the plugins you want to disable and or enable in pages and posts.
If you have any questions please let me know. I will be updating this post from time to time. So make sure you come back for the latest update.
Enjoy.
Go Back To WordPress Tutorials List: