WP CataBlog Admin Menu Options shows the different options in the admin menu you can set up to create and manage your catalogs and shopping cart.
Last Updated: November 23, 2019
Latest News: Updated the documentation below.
This post shows you the different options available in CataBlog admin menu. You will learn what each admin option does, how to edit, setup and manage the admin panel. You will also learn how to add new galleries, upload images, CataBlog templates and much more.
What You Need:
- CataBlog plugin.
WP CataBlog Admin Menu Options
Step 1 ) The following image CataBlog displays the admin menu structure.
- Library
- Add New
- Galleries
- Templates
- Options
- About

Library
Step 2 ) Go to CataBlog -> Library allows you to view and or select from the following options. You an also Add new libraries, take bulk action to one or all categories. You can even view the libraries using the following Grid or List view. See image below.
CataBlog Library Options
- Image
- Title = The Title can be used as a sorting filter.
- Description
- Link
- Price
- Product Code
- Categories
- Order = The Order can be used as a sorting filter.
- Date = The Date can be used as a sorting filter.

Add New
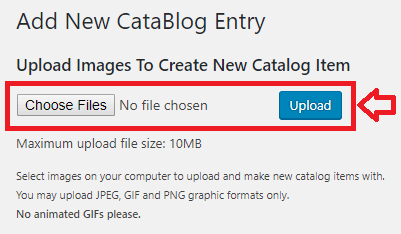
Step 3 ) Go to CataBlog -> Add New, it allows you to upload your images, files by selecting from the following options. See image below.
Add New Entry
- Click on Choose Files button when you want to upload your new entry.
- Click on Upload button when you are ready to upload the file.
Note: Remember the maximum upload file size is 10MB. Your maximum upload might be different. This is based on the following settings “PHP Max Upload Size: 10M“
Galleries
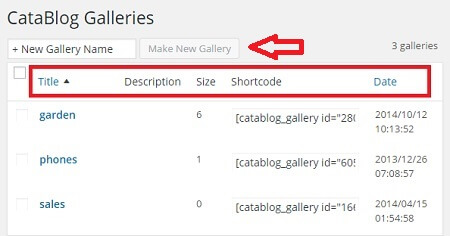
Step 4 ) Go to CataBlog -> Galleries, it allows you to view and or select from the following options. It also provides extra information. See image below.
CataBlog Galleries
- You can type a new gallery name in the following field New Gallery Name. Then click on Make New Gallery button when you are ready.
- Title = The Title can be used as a sorting filter.
- Description
- Size
- Shortcode
- Date = The Date can be used a sorting filter.
The following image shows you three galleries already created. Each gallery has a unique shortcode for you to copy and paste into a page, post or a widget. For example: One of the gallery shortcode [catablog_gallery id=”2806″ ].
Templates
Step 5 ) Go to CataBlog -> Templates, it shows you all the default templates created by the plugin when it was installed. It also allows you to create new templates. See image below.
Templates
- default
- single
- archive
- store
- + new
- Click on Save Changes button or undo current changes link.
Important: If you need to make changes try not to change the default templates. It is always best to add and configure a new template with your changes.

Options
Step 6 ) Go to CataBlog -> Options, it allows you to set up and manage the following options. Each option below controls a different part of the plugin. It is important to know and understand what each option does or else you will run into issues while using the plugin. See image below.
Options Settings
- Thumbnails
- LightBox
- Public
- Navigation
- Title Link
- Description
- Import
- Export
- Systems

About
Step 7 ) Go to CataBlog -> About, please read the following to learn more.
(The following instructions / information is quoted from the About tab in the plugin)
CataBlog is written by Zachary Segal in his spare time. It is a cataloging tool for WordPress that allows you to easily manage a list of items with automatically generated thumbnail images. Use of CataBlog is completely free, even commercial sites for now, all that I ask is that you rate the plugin at the WordPress Plugin Repository.
CSS Modifications: You may always override CataBlog’s CSS settings to create custom looks. If you make a catablog.css file in your active theme’s directory it will be automatically loaded and applied. This makes it easy to prepare your custom theme for CataBlog integration and will also protect your customization for future version to come.
The Server Statistics lets you know more about your server specifications. This information might come in handy if you need to troubleshoot some issues.
If you have any questions please let me know.
Enjoy.
CataBlog tutorials list: