WordPress Default TinyMCE Editor Toolbar Buttons post shows you all the different toolbar buttons available in the visual editor in WordPress.
Last Updated: August 7, 2018
Latest News: I have added more information.
Most people nowadays have used a word processor when typing e-mails or documents. WordPress visual and html editor works in the same way as a word processor. The visual editor is like a WYSIWYG “What You See Is What You Get” editor. The html editor works in plain raw text. No visual formatting is displayed. Everything you type is displayed in plain raw text format.
In this post you will learn all the different buttons available for you to use in the visual editor and also the html editor. This should be straight forward and easy to manage for most of you.
You might like to check the following URL TinyMCE to learn more about WordPress TinyMCE editor. I recommend the following plugin TinyMCE Advanced. Check the following URL WordPress TinyMCE Advanced Plugin Settings to learn more.
WordPress Default TinyMCE Editor Toolbar Buttons
Step 1 ) Go to Posts -> Add New to create a new post or you can go to Pages -> Add New to create a new page. This will allow you to view the default TinyMCE visual editor that comes with WordPress.
Visual Editor
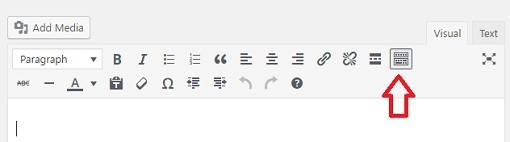
Step 2 ) The following image Visual editor displays the default TinyMCE editing buttons. You also have Add Media button, Text editor and Distraction-free writing mode.
Default TinyMCE Visual Editing Buttons
- Paragraph
- Bold
- Italic
- Bulleted List
- Numbered List
- Blockquotes
- Align left
- Align center
- Align right
- Insert/edit link
- Remove link
- Insert Read More tag
- Toolbar Toggle

Toolbar Toggle
Step 3 ) When you click on Toolbar Toggle button as illustrated below you will see a second toolbar displayed in the editor. This provide some advance editing buttons for you.
Advanced TinyMCE Visual Editing Buttons
- Strikethrough
- Horizontal line
- Text color
- Paste as text
- Clear formatting
- Special character
- Decrease indent
- Increase indent
- Undo
- Redo
- Keyboard Shortcuts
Paragraph
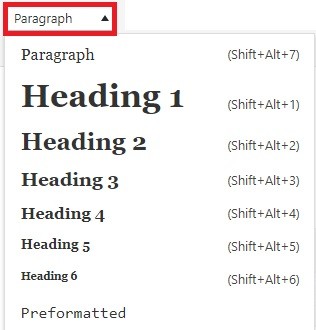
Step 4 ) The following image Paragraph shows you all the different text formatting for your writing.
Paragraph Formats
- Paragraph
- Heading 1
- Heading 2
- Heading 3
- Heading 4
- Heading 5
- Heading 6
- Preformatted
Text Color Picker
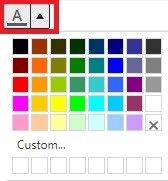
Step 5 ) The following image Text color shows you all the different colors you can select for your text. The following colors are considered safe web colors. Another words all browsers are capable of handling those colors without too many issues.
TinyMCE Default Colors
- Black, Maroon, Red, Magenta, Pink
- Burnt orange, Orange, Amber, Gold, Peach
- Dark olive, Olive, Yellow green, Yellow, Light yellow
- Dark green, Green, Sea green, Lime, Pale green
- Dark azure, Teal, Turquoise, Aqua, Pale cyan
- Navy blue, Blue, Royal blue, Sky blue, Light sky blue
- Indigo, Grayish blue, Purple, Red violet, Plum
- Very dark grey, Grey, Medium grey, White, No color
- Custom color
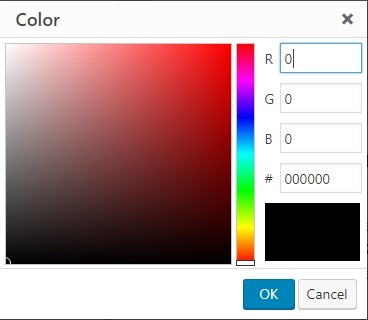
Custom Color Picker
Step 5-a ) When you click on Custom as illustrated in the above image, you will see the following Color tool picker. This allows you to create custom colors for your text. However be careful with this option because not all colors are easily managed by all browsers.
Text Editor
Step 6 ) The following image shows you the Text editor. The text editor shows you the raw file formatting for your posts and pages. There is no formatting, it is raw text.
Default TinyMCE Text Editing Buttons
- bold
- italic
- link
- b-quote
- del
- ins
- img
- ul
- li
- code
- more
- close tags

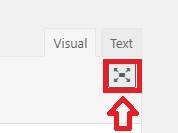
Distraction Free Writing Mode
Step 7 ) The following image Distraction-free writing mode button allows you to work in an environment where you see no admin side bars and no top menu. This is great when you only want to concentrate on writing your post and not get distracted with tools, admin menu etc.
That is how simple it is to work with TinyMCE visual and text editor.
To learn more about the editor, click on the following URL WordPress Posts Text Formatting Alignment.
I keep updating this tutorial form time to time so come back soon to check the latest.
If you have any questions please let me know.
Enjoy.
WordPress Setup Tutorial List: