Photonic Generic Options Layouts shows you how to configure the layouts settings and more.
Last Updated: June 15, 2020
Latest News: Updated the documentation.
This post shows you how to manage the different layouts available in Photonic. There is a huge list of options for you to choose from. You need to spend a bit of time understand what each settings does for each layout you select. Once you are satisfied with your options, save the settings.
Note: Remember to keep checking on the front of your site to make sure you are happy with your options.
What You Need:
Photonic Generic Options Layouts
Step 1 ) Go to Photonic -> Settings -> Generic Options -> Layouts as illustrated in the image below to start configuring the layouts.
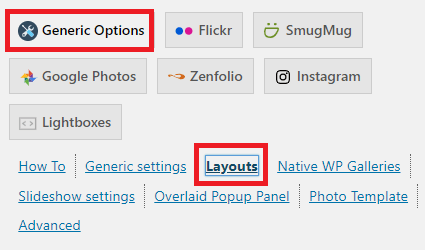
Image layout
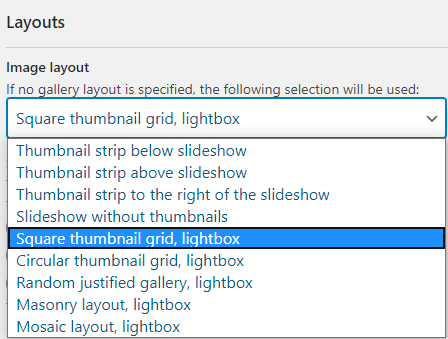
Step 2 ) The following image Image layout allows you to select one of the following options from the dropdown menu.
Image layout Options
- Thumbnail strip below the slideshow
- Thumbnail strip above the slideshow
- Thumbnail strip to the right of the slideshow
- Slideshow without thumbnails
- Square thumbnails grid, lightbox
- Circular thumbnails grid, lightbox
- Random justified gallery, lightbox
- Masonry layout lightbox
- Mosaic layout lightbox
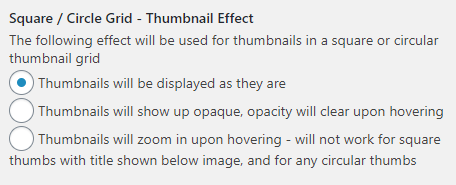
Square / Circle Grid – Thumbnail Effect
Step 3 ) The following image Square / Circle Grid – Thumbnail Effect allows you to select from the following options.
Square / Circle Grid – Thumbnail Effect Options
- Thumbnails will be displayed as they are
- Thumbnails will show up opaque, opacity will clear upon hovering
- Thumbnails will zoom in upon hovering – will not work for square thumbs with title shown below image, and for any circular thumbs
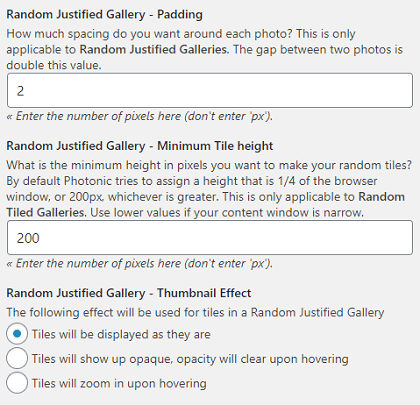
Random Justified Gallery
Step 4 ) The following image Random Justified Gallery allows you to enter and select from the following options.
Random Justified Gallery – Padding
- « Enter the number of pixels here (don’t enter ‘px’).
Random Justified Gallery – Minimum Tile height
- « Enter the number of pixels here (don’t enter ‘px’).
Random Justified Gallery – Thumbnail Effect
- Tiles will be displayed as they are
- Tiles will show up opaque, opacity will clear upon hovering
- Tiles will zoom in upon hovering
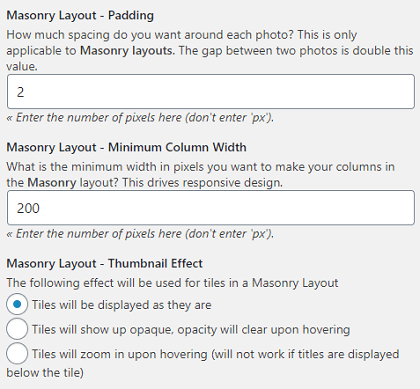
Masonry Layout
Step 5 ) The following image Masonry Layout allows you to enter and select from the following options.
Masonry Layout – Padding
- « Enter the number of pixels here (don’t enter ‘px’).
Masonry Layout – Minimum Column Width
- « Enter the number of pixels here (don’t enter ‘px’).
Masonry Layout – Thumbnail Effect
- Tiles will be displayed as they are
- Tiles will show up opaque, opacity will clear upon hovering
- Tiles will zoom in upon hovering (will not work if titles are displayed below the tile)
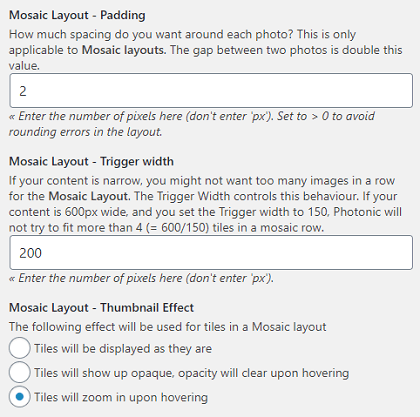
Mosaic Layout
Step 6 ) The following image Mosaic Layout allows you to enter and select from the following options.
Mosaic Layout – Padding
- « Enter the number of pixels here (don’t enter ‘px’). Set to > 0 to avoid rounding errors in the layout.
Mosaic Layout – Trigger width
- « Enter the number of pixels here (don’t enter ‘px’).
Mosaic Layout – Thumbnail Effect
- Tiles will be displayed as they are
- Tiles will show up opaque, opacity will clear upon hovering
- Tiles will zoom in upon hovering
Step 7 ) The following image allows you to save and reset the settings for layouts.
Save and reset settings for Layouts
- Once you have completed the Layouts settings you have three options as illustrated in the image below.
- Save page “Layouts”
- Reset page “Layouts”
- Delete all options

=====================================
Click on the following URL Photonic Generic Options Popup Panel.
This tutorial will be updated from time to time in accordance to any new changes made by Sayontan Sinha the developer.
If you have any questions please let me know.
Enjoy.
Photonic Plugin Tutorial List: