How To Speed Up WordPress Easy Steps post will help you improve the speed and performance of your website or blog.
Last Updated: December 21, 2021
Latest News: Fixed a broken link.
It is always a good idea to work with a child theme, recommended by many developers including myself. However you might choose not to work with a child theme. Also keep in mind this post was written mainly for beginners but it will also help advanced web developers. The intention was to write this tutorial without adding any code and only use plugins and online services to improve your website speed.
How To Speed Up WordPress Easy Steps
- Choose the correct host.
- Install A Theme = It is always important to check your theme for stability.
- Installing plugins.
- Install an avatar plugin
- Install a cache plugin.
- Optimize your Database and delete any Revisions.
- If you have a Facebook or Twitter account then you are probably using one or more plugins to automatically post to these social medias.
- Optimize your images to reduce the size and increase speed.
- Set up Google Custom Search Engine.
- Sharing on social media.
Important: The information below explains in detail each step above.
Step 1 ) WordPress is great, flexible and easy to manage CMS “Content Management System. However with the greatness comes a resource hungry system. Being a CMS running on PHP and MySQL requires some processing power. That is okay as long as you always signup with a great Host that also caters for WordPress. Most host nowadays have come to realize that WordPress is growing more and more and becoming the most popular platform on the internet. Therefore they have started to create special packages to run WordPress websites.
Most of you will start small, meaning you create a small blog or website. At the beginning you will not have much traffic at all because not many will know who your are online. So you don’t really need a very powerful Server and a Shared Account will suffice. In time you might outgrow from a shared account because you start getting a lot of traffic. That is when if you are serious about your website you will decide to move to a pro account, a vps or dedicated server. This also means that you will have more of the following; Processing Power “CPU”, Ram “Memory”, Space “Storage” and bandwidth “Traffic Access”.
Note: So make sure that who ever you decide to sign up with, can provide the flexibility to easily upgrade your plan to something higher with ease. This will avoid the hassle of moving from one host to another host.
Some host provide the following packages for you to choose from.
Packages:
- Shared Account
- Pro Account
- VPS Account
- Dedicated Server
Host I Recommend
Note: The following are affiliated links, I get a small commission if you sign up and or make a purchase.
- Justhost, The host I am using for this website and have been for the last 7 years or so.
- Bluehost, Bluehost and Justhost are sister companies. Bluehost is at the top of the list in wordpress.org website.
- Dreamhost is very reliable and has many different plans i.e. shared host, VPS host, dedicated server and cloud.
- WP Engine is a hassle-free WordPress hosting environment which helps you with your speed, security, support and it is fully managed.
“Important: It is good to remember that on a Shared Server Account you have many limitations and you will only be able to do so much to improve the speed even with plugins. If you are in a Pro Server Account the speed starts to improve substantially. However, if you are serious about your speed then sign up for a VPS or Dedicated Server. The speed will improve dramatically and you will have the freedom to manage your server resources.”
Choosing a Theme
Step 2 ) When it comes to choosing a theme you need to make sure the theme is up to date and well supported. Too many web developers install a theme simply because it looks great and or it might be free. This is not always the best option. You should really investigate more about the theme by reading reviews and carrying out test in a testing environment. Once you are happy with the tests and you are certain about the theme, that is when you install it in your site.
Theme Options To Consider:
- Is it heavy or light in weight?
- Is up to date or not?
- Does it have a very good report?
- Are the developers constantly updating any issues found in the theme?
- Have the developer or developers been in the market for a long time?
Note: When installing themes, also install the following plugin Theme Check to test your theme.
Installing Plugins
Note: When installing plugins, also install the following plugin Plugin Inspector to test your plugins.
Step 3 ) The plugin that I sometimes use is Speed Booster Pack. The plugin has a few options apart from Google Libraries. Just play around with the settings until you get the desired speed.
Warning: Speed Booster Pack is very powerful and tricky to use. So make sure you create a backup and you know what you are doing before you use this plugin.
When choosing a cache plugin you should check to make sure it can perform the following.
- Cached pages will be valid for
- Enable compression
- Enable on-the-fly compression
- Allow browser caching
- HTTPS and HTTP caching capabilities = For example Bypass the cache, Cache separately or Use the standard cache ( I have HTTP/HTTPS aware pages)
- Mobile capabilities
- CDN = Content Delivery Network
- Far future expiry header = If your cache plugin does not have this feature you can always use the following plugin far-future-expiry-header.
Step 3-1 ) Install WP User Avatar to manage your local avatar and create a default local avatar. This will save time when visitors who don’t have an avatar use your default avatar. It also means that you will be using your own resources which can also speed up the process if you run a fast server.
Step 3-2 ) Install and set up a cache plugin. I use Hyper Cache for it’s simplicity and functionality. You might like to read the following tutorial Hyper Cache General Settings. There are many cache plugins nowadays that are great and work well for many. I have added a list below for you to test if Hyper Cache is not what you want or does not work for you.
Note: Other cache plugins I recommend WordPress Cache Plugins.
If you are using WP Super Cache or Hyper Cache, you can further improve your speed and performance by using Autoptimize in conjunction.
Note: You might also like to check the following link w3 Total Cache Troubleshooting for more tips.
========================================
Optimize Database
Step 4 ) Install and configure Optimize Database after Deleting Revisions. This plugin has only a few options to setup, go to Settings -> Optimize DB Options and configure the plugin. Once you have the plugin set up, run it regularly to optimize you database. This can improve the speed your website carries out when performing tasks between the server and the website on the browser.
Note: Other Database Optimizing plugins I recommend WordPress Optimize Database Plugins.
========================================
Social Media Sharing
Step 5 ) If you have not signed up to Facebook and Twitter, then I recommend you do. Once you have signed up then read the following tutorial Publish WordPress Posts To Facebook and Twitter. Currently I am testing Zapier external service to publish posts and pages directly to Twitter and Facebook. There are many different online services for you to choose from. There are also great plugins that will do a great job. However the goal here is to use as less plugins as possible. That’s the reason why I choose an external service.
Note: The more plugins you use the more resources your server will use like memory and processing power. This will increase your page load time.
Step 6 ) There are two different methods I use to optimize your images.
- Method 1 ) I use an online service Gtmetrix.com.
- Method 2 ) I also use EWWW Image Optimizer plugin. You might like to read the following tutorial Optimize Images Using EWWW Image Optimizer Plugin.
Step 7 ) Click on the following URL Google Custom Search Engine to add Google Custom Search engine to the website.
Step 8 ) I am sure most of you will be sharing your information with some of the most popular social medias out there like Facebook, Twitter, Linkedin, Google Plus, Youtube and much more. The following URL Social Plugins is a list of social sharing plugins I recommend.
========================================
Recommended Testing
Step 9 ) Does your website follow Google rules? Is your site loading fast? These are some of the options you need to check on your site. The following link https://www.internetmarketingninjas.com/tools/ provides many free tools that can help you.
Step 10 ) How does your website compare to W3 standards? Click on the following URL validator.w3.org/ If you have to edit and test your code, I suggest that you use W3Schools which has all you need to troubleshoot css, html, js errors and more.
If you install all the plugins mentioned above and you follow the instructions you will notice a difference in speed and performance for your website or blog. This will make Google happy which is good for SEO. Of course there are more options you can implement to speed up your WordPress website but I just wanted to share with you the simplest method for anyone who wishes to try without having to hack or add some code.
Other Options To Consider.
If you are using a shared host for your website or blog. Shared host have many websites hosted in the one server using the same IP address. This can also cause problems with your speed and performance. You will also notice spiking on your account from time to time. Here is a website you can use to check and see how many websites are hosted on your shared server, https://www.yougetsignal.com/tools/web-sites-on-web-server/. This tool only reveals the main domains hosted on the shared server including the URL, it does not show add on domains or sub domains. If you want a total number of domains in your shared server then check the following URL https://reverseip.domaintools.com/. This tool will give you a total number but it will not reveal the URL of the domains.
Once you have completed all of the above to Speed Up WordPress, click on the following URL pindom website speed test and run a test.
Other tools you can use to carry out a speed test.
- Google Speed Test
- Gtmetrix
- Test your website with the WP Engine WordPress Speed Test.
Note: Run a test before you begin with the above settings and another one after you complete the settings. This will allow you to better compare if there are any improvements.
Mbrsolution Basic Information (VPS account) 2016
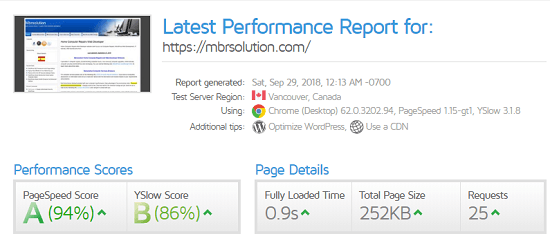
Info: I am also getting 94/100 Google Speed Test, I am very happy with this.
- VPS none SSL hosting account Justhost = Note: This is an affiliated link, I get a small commission if you sign up and or make a purchase.
- 589 post
- 41 pages
- 844 Comments
- 2821 images
- I have 21 plugins installed and 14 plugins are active
- WordPress 4.5.4
Note: The following two images were created on September 25, 2016.
Gtmetrix image test results September 25, 2016.

Pindom image test results September 25, 2016. 
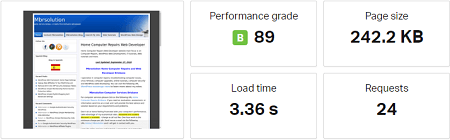
Mbrsolution Basic Information (VPS account) 2018
- VPS SSL secured hosting account Justhost = Note: This is an affiliated link, I get a small commission if you sign up and or make a purchase.
- 740 post
- 51 pages
- 947 Comments
- 3618 images
- I have 22 plugins installed and 19 plugins are active
- WordPress 4.9.8
Gtmetrix image test results September 29, 2018.
Pindom image test results September 29, 2018.
==================================
The above should help you get your website running faster and smoother.
Remember: The less plugins you have running the faster your website will perform.
I hope this helps you. I will be updating this post from time to time. So make sure you come back to view the latest results.
Enjoy.