Google Authenticator Security WordPress tutorial show you how to create a second level security for your WordPress website.
Last Updated: June 23, 2023
Latest News: Updated the documentation.
In this post you will learn how to setup Google Authenticator plugin. Nowadays everyone is aware how important it is to secure their website login. Adding a two factor login procedure is one way to make your site login more secure.
The two-factor authentication requirement can be enabled on a per-user basis. You could enable it for your administrator account, but log in as usual for other less privileged accounts.
If you are serious about your website security then install this plugin and follow these simple instructions.
Google Authenticator 0.54 changelog.
- Fixed a bug in multisite.
What You Need:
- Google Authenticator Plugin
- A Smartphone, iPhone or a Google account to use an app through the browser
- Google Authenticator App is one that I recommend.
Google Authenticator Security WordPress
Important Must Read First
Remember: Every person that has an account in your website should activate this security feature in their profile. It is up to you to encourage your members to do so. (Note: This process might change in the future.)
Step 1 ) Install and activate the plugin as illustrated in the image below.

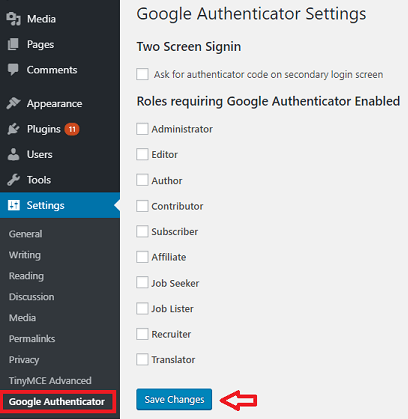
Step 2 ) Go to Settings -> Google Authenticator as illustrated in the image below to set up the following options.
Google Authenticator Options
- Two Screen Signing = This allows the field to enter the authenticated code on a second screen instead of displaying the field on the default WordPress login screen. Enabling this option also means that if the user has not enabled the security plugin in their profile account, they will not see the field to enter the code when they log into your site.
- Roles requiring Google Authenticator Enabled = This feature helps you to further manage who should see the the option to enable this feature based on their profile role.
- Click on Save Changes button when you finish with your settings.
Updating Your Profile
Step 3 ) Go to your user profile as illustrated in the image below. This allows you to activate the two step security.
Note: This steps has to be carried out by all the Users in your site.

Step 4 ) The following image Google Authenticator Settings allows you to set up and activate the following options.
Google Authenticator Settings Options
- Active
- Relaxed mode to allow enough time to enter the code.
- For Description c= use a simple description.
- Copy the Secret code, somewhere safe.
- Click on Show/Hide QR code button.
- You can enable Enable App password = However if you do this will decrease your overall login security.
Important: The activation is performed only once. After that the mobile app in your mobile phone or google account will provide you with your authenticating code.

Step 4-a ) The following image shows you the QR code you need to scan with your mobile phone app. (Note: Make sure you have a valid QR scanner app installed in your mobile phone)

Step 4-b ) Make sure you click on Update Profile button to save your settings as illustrated in the image below.

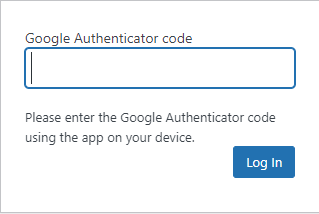
Step 5 ) Log out from your account. If everything goes well you should see a second level of security field Google Authenticator Code on your login screen as illustrated in the image below.

Step 5-a ) The following image illustrates the secondary screen if you have enabled the following feature Two Screen Signin.
Google Authenticator Login Test
Step 6 ) It is a good idea to test your new login just in case something went wrong. To log back into your account, you will now need to enter your Username, Password and your Google Authenticator code as illustrated in the image below. The code is provided by the app you installed in your mobile phone.
Note: The Google Authenticator Code you see in the image below is just an example of the code you will need to enter when login in.

Step 7 ) This plugin also works in a Multisite installation. Make sure you network activate the plugin and then log in as the user for each subsite in your network. This allows you to activate the plugin for the user logged in.
Troubleshooting
Note: If you enter a space on your description or you use a tilde, a character with a stress on top or accent the QR will not work.
Q1 What if you forget the code or security code, lost your phone, accidentally deleted the App from your mobile phone?
Follow these instructions:
- Ftp into your server, you can use Filezilla for windows.
- Locate the plugin directory as illustrated in the image below and rename the folder.

- Check your login again and see if the extra security level field has been removed as illustrated in the image below.

================
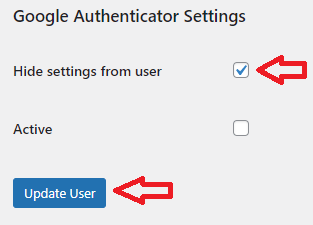
Q2 How do I hide Google Authenticator settings from users?
Solution: Log into your site as administrator and go to Users -> All Users. You can then check each user individually to see if they have enabled the security feature by checking Active or not. If they have not enabled the security feature in their account you can hide the feature by enabling Hide settings from user as illustrated in the image below. Note: This option works best if you also have Two Screen Signin enabled in the settings as illustrated in Step 2 ) above.
================
Alternative to Mobile Phone
Info If you don’t have a smartphone you can use some Google Extensions. The following is one that has very good reviews the-qrcode-generator.
Recommended Links:
===================================
That is how simple it is to set up a Two Level Authentication Security for your WordPress website.
If you have any questions please leave a message. I will be updating this tutorial from to time to time. So keep coming back for any latest updates.
Enjoy.
More WordPress Plugins Tutorials:
Hi,
Thanks for a great tutorial on Google Authenticator.
I have read through and implemented the process that you outlined in your tutorial. I then updated my profile and saved my new settings as instructed. I then logged out and tried to log back in but couldn’t, as it was asking me to input the QR code but I couldn’t see the QR code. I then had to ask the administrator to re-set my log in. He also explain that i needed to click on the show/hide QR code during the setup stage. and also to scan the displayed QR code with my smart phone during the setup, and that this step is only done once before you update your profile. next time when I log back in it will ask me for the Google authenticator code, which i should get through my smart phone. I think that step 3 of the tutorial should be updated and include a step in there explaining that the scanning of the QR code is done once during the setup stage and that it will be the only time that you will see the QR code. because next time you log back in you will have the access code on the mobile phone, that is where i got confused as i automatically thought that the QR code will be visible every time you try to log in, which is not correct. anyway hope it makes sense what I am trying achieve as i think it would make it easier for a first timer like myself. Thank you. J.Romero
Hello Joaquin Romero, thank you for your comment.
After reading your review and poiting out that more information needs to be added to step 3. I can see your point and will make some changes to better explain the whole procedure. It is always a good idea to take on what readers suggest as they are the ones that read my tutorials.
Once again thank you for your review.
Hi,
Thank you for the change in your tutorial, I’ve had a browse and it looks great, that extra paragraph will really help.
thank you.
J.Romero
You are most welcome Joaquin Romero ;)
Just adding some insights to this post if you’re having troubles adding new users once 2FA has been enabled.
Step 1: Install the per user plugin
Step 2: When adding a new user, note their password and also ensure ‘active’ is disabled under their profile for Google Authenticator
Step 3: Login as that user and set up their Google Authenticator details (if you login as an admin you can’t set these settings on behalf of another user, well I couldn’t if the user was say an Editor)
Step 4: Provide QR Code to that user along with their access details
Step 5: User downloads Google Authenticator App and scans code before first access
Step 6: User (should) changes password as you’ve previously copied down their password to set it up for them
Step 3-6 you can ask the user to do but you know what they’ll do, they’ll leave 2FA switched off until they need it (which will be after they get hacked) :)
Hope this helps peeps out there.
Regards,
Tim Sutherland
68 Consulting
Thank you Tim for your extra troubleshooting steps. I am sure this will helps other.
Kind regards
Hi, Great post and steps, thanks! I have a membership site using Wishlist Member and for new users all I want is for them to login using 2FA and access the content – 2FA to prevent sharing one account among many would be paying subscribers.
However, the setup of this seems to require a manual process for each new user.
Do you know of any integrations or processes with WLM that can assist an automatic signup by the new subscriber? Rather than having the administrator go through each new user and setup sending them the Secret key or QR code?
As well if you’ve come across a better way to prevent people from sharing logins (currently using Limit Login Attempts Reloaded & Prevent Concurrent logins).
much appreciate any comments/suggestions.
Hi, thank you for your comment. Unfortunately I don’t know much about Wishlist Member “I assume this is a plugin”. I know of a plugin that automatically logs the members into the site after they successfully register as a member. Would this information help you?
Kind regards
So I activated the plugin and then stepped away from my computer and got signed out without the setup :(. What do I do now? I didn’t scan the QRcode or anything!
Hi Ru, did you enable the plugin for your WP User? For example, when you try to log in does it ask you for the authentication code? If it does and as you mentioned above, you did not scan the bar; then you need to carry out the troubleshooting steps found in this tutorial. Let me know how you go.
I found a problem with the all in one security plugin running with this plugin. I got locked out after installing google authenticator. I had to disable the captcha feature and then authenticator worked correctly.
Hi Mark, do you have the login captcha enabled in aiowps? Do you also have one of the Brute Force features enabled in aiowps?
Regards