How To Create Catablog Categories Basic Tutorial shows you how to create catablog categories so you can group your images into different categories.
Last Updated: February 11, 2018
Latest News: I have updated the documentation.
In this post you will learn how simple it is to create categories which is similar to creating galleries. This helps you group your images into categories and then display them using a shortcode. Images can be grouped into one or more categories.
The following list is an example of different types of categories that can be assigned to each gallery.
Categories Assigned To A Gallery
- Weddings (Gallery) = Categories (young weddings, old weddings, 50’s weddings etc)
- Baptism (Gallery) = Categories (date baptism, location baptism etc)
- Birthday Parties (Gallery) = Categories ( date, location, old, young etc)
- Year (Gallery) = Categories (month, week, day, time etc)
- Toys (Gallery) = Categories (electrical, board games, dolls etc)
- Houses (Gallery) = Categories (old, new, expensive, cheap etc)
- Buildings (Gallery) = Categories (tall, short, high rises, warehouses etc)
How To Create Catablog Categories Basic Tutorial
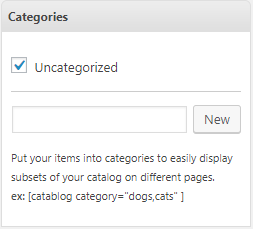
Step 1 ) The following image Categories allows you to create as many categories in catablog as you need to organize your images into groups. To access Categories go to CataBlog -> Library and edit an image. This will allow you to start creating your categories.
Note: By default CataBlog adds a default category Uncategorized. Make sure that when you start adding new categories you uncheck the default category for every new image you add.
Step 1-a ) If you cannot see categories or other information for your library, click on the Screen Options button located on your top right hand corner.
The following image illustrates all the options you can enable or disable for your catablog library.
Show On Screen Options
- Description
- Link
- Price
- Product Code
- Categories
- Order
- Date
- Catalog items, click on Apply button if you change the default number.

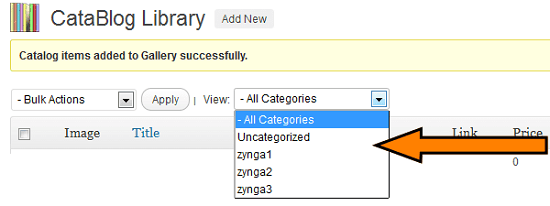
Step 2 ) The following image shows you how to display your images based on the Category selected from the drop down menu. In this example there are three categories in the drop down menu.
Categories Created
- zynga1
- zynga2
- zynga3
Step 3 ) The following shortcode is an example of how to display images that belong to a category. In this shortcode the category is zynga1. So all the images that belong to this category will be displayed.
- [ catablog template=”gallery” category=”zynga1″ ]
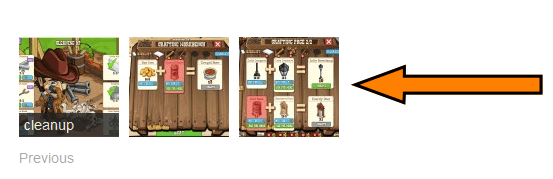
Step 3-a ) The image below shows you all the images that belong to category zynga1.
That is how simple it is to create categories and display images that belong to a category. I hope the above helps you understand how catablog category system works.
If you have any questions or suggestions please let me know.
Enjoy.
CataBlog tutorials list: