Optimize Images Using EWWW Image Optimizer Plugin post shows you how to quickly optimize your images through Media in admin.
Last Updated: April 3, 2024
Latest News: Updated the changelog.

Nowadays many website owners are spending a lot of time making sure their WordPress websites is fast for SEO purposes. This keeps search engines like Google happy. One area that some keep forgetting is the optimization of their images. These instructions will help you to optimize your images using EWWW plugin.
I chose EWWW Optimizer Plugin for this tutorial because the developer is very much active in the forum and keeps his plugin up to date.
EWWW Image Optimizer 7.5.0 changelog
- added: Easy IO support for upcoming Slider Revolution 7 rendering engine
- added: Easy IO updates existing image preload URLs
- added: Lazy Load automatically excludes preloaded images
- changed: async process locking uses unique key on disk to avoid duplicate processes
- fixed: Easy IO skipping Slider Revolution 6 URLs
- fixed: Lazy Load incorrectly auto-scales fixed group background images
- fixed: uncaught errors when attempting svgcleaner install on FreeBSD
- and more.
Information: These instructions are based on the EWWW default settings. I did not make any changes to the default settings after I installed the plugin. You might choose to make some changes yourself to better optimize your images.
What You Need:
- EWWW Image Optimizer
- A wordPress.org website
Optimize Images Using EWWW Image Optimizer Plugin
Step 1 ) Install and activate the plugin like you normally do in WordPress.
Important: Be advised that the moment you activate the plugin all images loaded to your WordPress website will be optimized in accordance to your settings.
Step 2 ) Go to Settings -> EWWW Optimizer Plugin to set up and configure the plugin. You can set up the following options. See image below.
- Cloud Settings
- Basic Settings
- Advanced Settings
- Conversion Settings
Remember: I made no changes to the default settings for this tutorial.
![]()
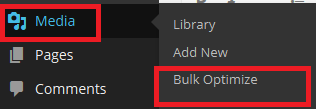
Step 3 ) The following image Media shows you the menu structure when you log in as admin. The following option is added when you activate EWWW Image Optimizer plugin.
- Bulk Optimize
Step 4 ) The following image shows you the two images above optimized while the plugin was active. You can see a huge reduction in size, almost 50% in both images. This will definitely speed up your website or webpage when it loads up on the browser.
- First image reduced by 47.7%
- Second image reduced by 49.0%

Step 5 ) I deactivated the plugin and uploaded an image, the image size is 8.21 kb. After the image was uploaded I activated the plugin. You can see in the following image that it needs to be optimized.
This is only one image, imagine if you have more than 2 thousand images. That would add a huge load to your website plus your backups would be larger in size.
Information: I only activate this plugin once I have uploaded the images. You might like to have the plugin active all the time.
Image Optimizer
- Not processed
- Click on Optimize now! link to optimize the image

Media Library
Step 6 ) The following image shows you another option in the drop down menu under Media. This allows you to select more than one image to optimize which can come in handy if you have many to optimize. Select your images to optimize, then click on the down arrow. Select Bulk Optimize from the drop down menu and then click on Apply button to start the process.

Step 7 ) The following image displays the Bulk Optimize options from the above process. You can see two images selected. Click on Start optimizing button to begin to optimize.

I have illustrated the basic and most simple way to optimize your images using this great plugin. Remember this plugin has more settings that allows you to carry out more options even to convert images from one file format to another file format.
If you have any questions please let me know. I will be updating this from time to time. So keep coming back for the latest post.
Enjoy.