WordPress ClassiPress Theme Menu Setup post shows you how to set up and manage the menus in the homepage of the site and more.
Last Updated: February 12, 2019
Latest Update: I updated the information below.
In this post you will learn how to set up, manage and assign menus to different theme locations in your site. ClassiPress 4.1.0 has four theme locations available for you to play around with. Each theme location allows you to assign a menu. It is up to you to decide which menu you want to add to each location. This post covers some basic knowledge about the settings you should set up in WordPress before you start adding menus.
Note: This tutorial is based on ClassiPress default theme settings.
ClassiPress Theme Menu List:
WP ClassiPress Theme Menu Setup
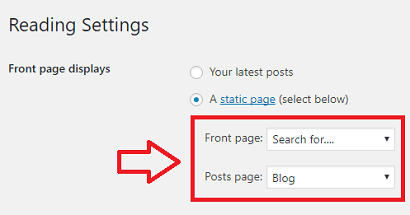
Step 1 ) After you have configured and set up ClassiPress theme you need to set up the Front page reading display settings in WordPress.
The following image Reading Settings shows you how to select the themes home page, blog page or select to display the latest posts in your site. Go to Settings -> Reading -> Your homepage displays to set up your homepage.
Note: The settings displayed in the image below is an example of what you can add to your Homepage and Posts page area.
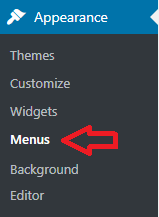
Step 2 ) Go to Appearance -> Menus as illustrated in the image below. This allows you to set up the menus in ClassiPress.
Note: You might like to check the following URL How To Create A WordPress Menu to learn more about creating and managing menus in WordPress.
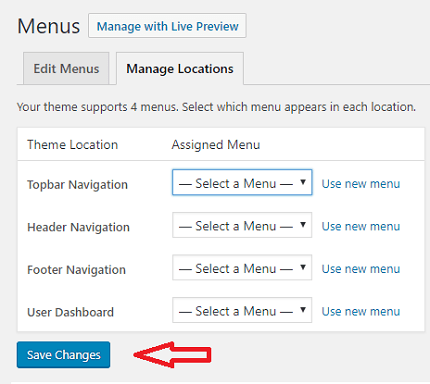
Manage Locations
Step 3 ) The following image Manage Locations shows you the different locations you can add a menu in ClassiPress 4.1.0. All you have to do is select the menu you want to assign to the theme location. There are 4 theme locations.
Manage Locations
- Topbar Navigation
- Header Navigation
- Footer Navigation
- User Dashboard
- Click on Save Changes button when you finish with the settings.
Assigned Menu
Step 4 ) The following image Assigned Menu shows you a list of different menus you can select and assigned for each theme location.
Note: The menus in this list are just example menus. You can assign any menu you want. However make sure the name of the menu you assign corresponds with the menu location name. For example: Footer location corresponds well with footer menu, Header location corresponds well with header menu. I am sure you get the meaning.
Assigned Menu
- Dashboard
- Footer
- Header
- Primary
- Secondary

==============================
That is how simple it is to set up your menus in ClassiPress theme.
If you have any questions or suggestions please leave a comment.
There will be more tutorials coming soon. So make sure you keep coming back for the latest.
Enjoy.
ClassiPress Theme Tutorial List:
My website is: https://freeads.site
I bought the classipress 4.1.3
Can you help me, please?
How to edit on the home page that huge space that appears with the text Ad Linstings in the middle?
Or delete that space?
Thank you
Hi Júlio, can you contact me via my contact form.
Thank you