Template Toaster WordPress Theme Add Slideshow post will show you how to add a slideshow to your website, add slides and much more
Last Updated: March 22, 2017
Many websites nowadays add slideshows to the front page or landing page. Template Toaster has this feature included for you to add a slideshow. The following instructions should help you add a slideshow, position the slideshow in your front page and add some customization to each slide. There are many customization for you to play around with. Spend some time understand each and every option available.
Currently Template Toaster only allows you to position a slideshow in 3 different areas, Above, Middle and Below the header. These are usually the default areas a slideshow is added to a website.
Template Toaster WordPress Theme Add Slideshow
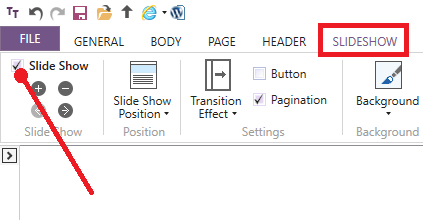
Step 1 ) Click on Slideshow tab and then enable slideshow as illustrated in the following image.
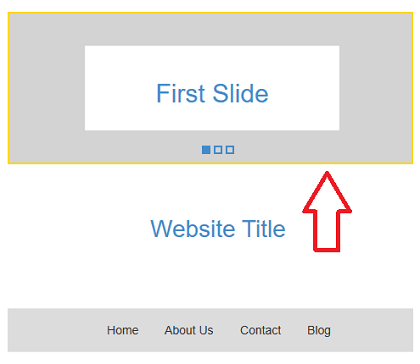
Step 2 ) After you have enabled the slideshow, a slideshow will be displayed for you on the template. By default the slideshow will appear above the header as illustrated in the following image.
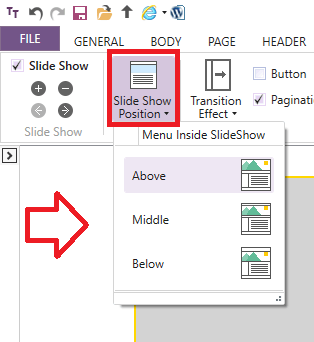
Step 3 ) To change the position of your slideshow click on Slide Show Position tab. A drop down menu will be displayed as illustrated in the following image. Currently there are only 3 positions available.
Slideshow Positions
- Above
- Middle
- Below
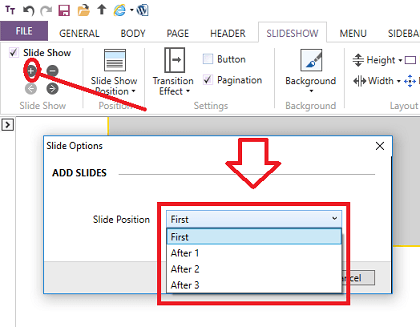
Step 4 ) You can add as many slides to a slideshow as you want. Click on the plus symbol as illustrated in the following image. You will see a drop down menu that allows you to select where you want to add the new slide.
Slide Position
- First
- After 1
- After 2
- After 3
Note: The above list only has 3 slides, which is the default added by Template Toaster when you add a slideshow. In your case you might have more than 3 slides.
Step 5 ) The slideshow menu has many options for you. These options will help you improve and style the slideshow design.
Slideshow Menu Options
- Settings
- Background
- Layout
- Effects
- Foreground
- Text Areas
- Logo
- Bookmark

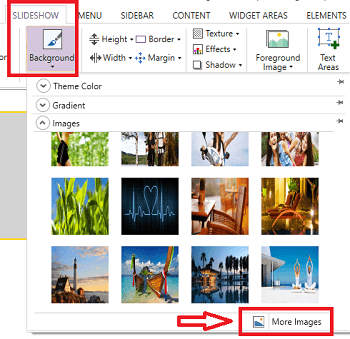
Step 6 ) When you add a background image to your slides make sure you remember to remove a URL link to templatetoaster.com. This might be removed in the future but as of version 6.0.0.11001 the link is still added when you install the software.
To get to the link, click on Slideshow -> Background -> Images -> More Images as illustrated in the image below.
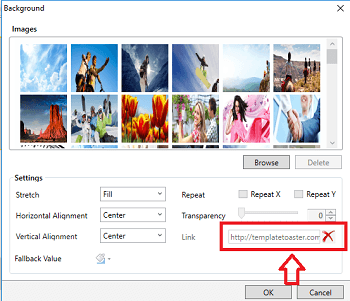
Step 6-a ) The following image illustrates the link you need to delete.
Note: This might be removed by the developers in future release.
The above shows you how simple it is to add a slideshow to a website.
If you have any questions please let me know. There will be more tutorials coming soon.
Keep coming back for more.
Enjoy.
Go Back To Template Toaster Tutorials: