WordPress Duplicator Backup Plugin Create Package shows you how to to backup and create a quick package with all your files and database for later usage.
Last Updated: June 10, 2020
Latest News: Updated the documentation.
In this tutorial you will learn how to create a backup package using Duplicator plugin. These steps are very simple and easy to follow. The plugin has come a long way since it was released. The plugin first runs a check to make sure your site is ready to create a backup without any issues. These checks makes it very easy to find out if your back is ready or not.
What you need:
- WordPress Duplicator Plugin
- You might like Duplicator Pro. (Note: This is an affiliated link. I get a small commission if you make a purchase.)
WordPress Duplicator Backup Plugin Tutorials:
- Settings
- Tools
- Create Package
- Packages
- Troubleshooting
Note: Requirements: Pass is very important information. It lets you know that everything has passed. This lets you know that you should not have any issues in creating the packages and later on restoring or moving to a new server.
WordPress Duplicator Backup Plugin Create Package
Step 1: Package Setup
Step 1 ) Go to Duplicator -> Packages -> Create New to set up the following options as illustrated in the following image.
Create New Options
- Name
- Notes
- Storage
- Archive
- Installer
- Click on Next button to continue

Step 2 ) The following image Archive lets you set up where you would like to store your backup. By default it will store your snapshot into your server. If you want to send the snapshot into Dropbox, FTP and or other storage options you need to purchase Duplicator Pro. (This is an affiliated link. I get a small commission if you make a purchase.)
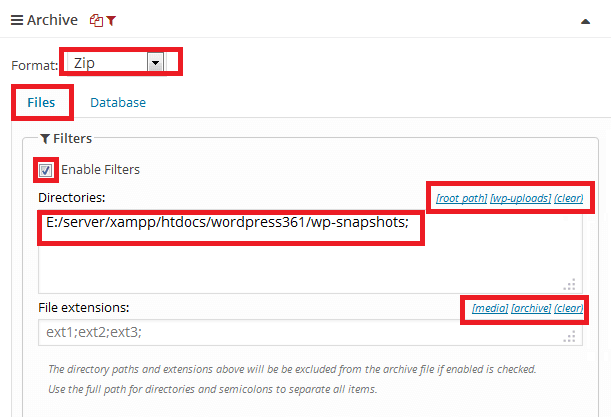
Step 3 ) The following image allows you to set up the following options.
Files
- Format to select “At the present there is only one format available”
- Enable Filters
- Directories = root path, wp-uploads and clear
- File extensions = media, archive and clear
Step 4 ) The following image allows you to select the following options.
Database
- Enable Filters = All or None

Step 5 ) The following image Installer allows you to enter and select the following options.
STEP 1 – INPUTS
MySQL Server
- Host
- Host Port
- Database
- User
Advanced Options
- SSL = Enforce on Admin and Enforce on Logins
- Cache = Keep Enabled and Keep Home Path
STEP 2 – INPUTS
- New URL
Please Note: Even though you have the option to skip step 2, I would encourage you to perform this step. It is better to be safe than sorry.

Step 2: System Scan
Step 6 ) The following image Step 2: System Scan lets you now whether or not your system is good or has issues.
Server Options
- PHP Settings = Good
- Cached Data = Good
- Timeouts = Good

Step 7 ) The following image lets you now whether or not your system is good or has issues.
Files Options
- Total Size = Good
- Invalid Names = Good
- Large Files = Good
Database
- Total Size = Good
- Table Details = Good
- Large Files = Good
- Click on Build button

Step 3: Build Package
Step 8 ) The following image Step 3: Build Package illustrates the package being built.

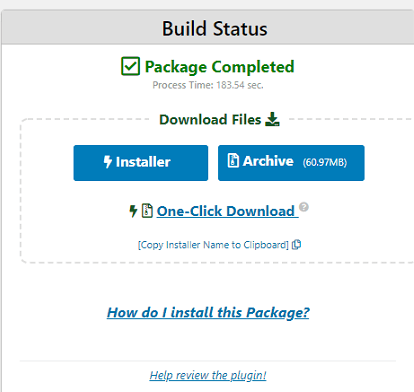
Step 9 ) The following image Build Status illustrates the Package Completed in Step 3: Build Package. You then have the following options.
Build Status Download Options
- Installer
- Archive
- One-Click Download
- Copy installer Name to Clipboard.
- You can also click on How do I install this package? link to learn how to install the package.
That is all you need to backup and clone your website. If you think this free plugin is great you should try Duplicator Pro.
Click on the following link Troubleshooting to continue with the set up.
I will be updating this tutorial from time to time so make sure you come back for the latest updates.
If you have any questions please let me know.
Enjoy.