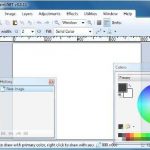
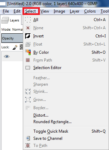
This tutorial teaches you how to backup and restore joomla using Akeeba Backup. Akeeba backup is one of the best software to backup your joomla installation. I have used it for a few years now without a problem and I always recommend it to everyone that runs Joomla and would like to use a free backup software. I can tell you that it has saved my site many times.
Hint: Click on an image to see a larger size
First download Akeeba Backup and install it as you would normally install a module or component. Login to joomla as the administrator and upload the zipped file you downloaded above and configure it according to your requirements.
Hint: It is recommended to use jpa compression format. Have a read about the difference between zip and jpa format from Akeeba Backup user guide online
Once you have configured Akeeba backup click on Components >> Akeeba Backup and then click on Backup Now. See images below:
Step 1) Click on Akeeba Backup

Step 2) Click on Backup Now

Step 3) Click Backup Now! and you can enter some description.

Step 4) View the backup in process
Important: Do not brows to another page while you are in backup mode unless you see an error

Step 5) Administer your backup file

Step 6) View the file details including the size and you can download the file.
Hint: I prefer to use FTP to download any files from the server

Backing up is very simple as you can see from the instructions above.
In the following steps you will learn how to restore your website to the same server:
Step 1) Unzipped the file you downloaded in Step 6) using akeeba extract wizard above and zip the content in a format that your server can read i.e. .zip format. Hint: Only use akeeba extract wizard if you zipped your file in jpa format.
Step 2) Log into your server and delete your old website files from the root of your site
Important: Delete only joomla files and joomla folders, no other files. You can keep a copy of .htacess but rename it to something like htacess.txt and after the success of the installation make sure that you rename it back to .htaccess only if the zipped .htaccess is corrupted for some unknown issue.
Step 3) Upload the zipped file to your server and unpack the content to the root of your website where you deleted the joomla folders and files
Step 4) After unpacking make sure that all the folders and files are there or else you will get errors when you start the installation process
Step 5) Now open your web browser and type the URL of your website i.e. http://www.example.com/installation/index.php click enter on your key board and follow the onscreen instructions.
Important: Make sure you select to remove the installation directory automatically. See images below:

Installation directory deleted, click OK

Step 6) That’s it, your joomla website should be up and running. It is as simple as that
TIP: Make sure that you have access to your password and database name which you documented when you installed joomla for the first time and kept in a safe place. This is very important just in case something goes wrong and you need to add the username and password.
I Hope these instructions can assist you, if you have any questions send me an e-mail or post a message here.
Good luck